Appearance
MCP for AI Agents
FluentCRM ships with a built-in MCP (Model Context Protocol) server that connects your CRM to AI clients like Claude Desktop, Claude Code, Cursor, and OpenAI Codex. Once it's set up, your AI assistant can read your contacts, send a test campaign, enroll people into automations, or look up reports as part of an ordinary conversation. No third-party proxy, no extra service to host, no API keys to manage outside WordPress.
You can think of MCP as a bridge between your AI client and FluentCRM. Instead of you opening the admin and clicking around, the AI calls the same actions you would, but through a secure, authenticated endpoint. You stay in control: every action is authorized by a WordPress Application Password you generate yourself, and you can revoke that access at any time.
NOTE
The MCP feature is available on both free and Pro versions of FluentCRM. FluentCRM Pro adds a one-click installer for the companion plugin and exposes some extra MCP tools from FluentCampaign Pro. See what Pro includes →
Open the MCP settings
From your WordPress admin, go to FluentCRM → Settings → AI Configuration → MCP for AI Agents. Everything you need lives on this one page: the adapter install, the on/off toggle, the endpoint URL, and the connection snippet for your preferred AI client.
Step 1: Enable MCP for AI Agents
With the adapter active, switch on the Enable MCP for AI Agents toggle at the top of the page. When enabled, FluentCRM exposes its abilities through the adapter so AI agents can read and write your CRM data with your authorization.
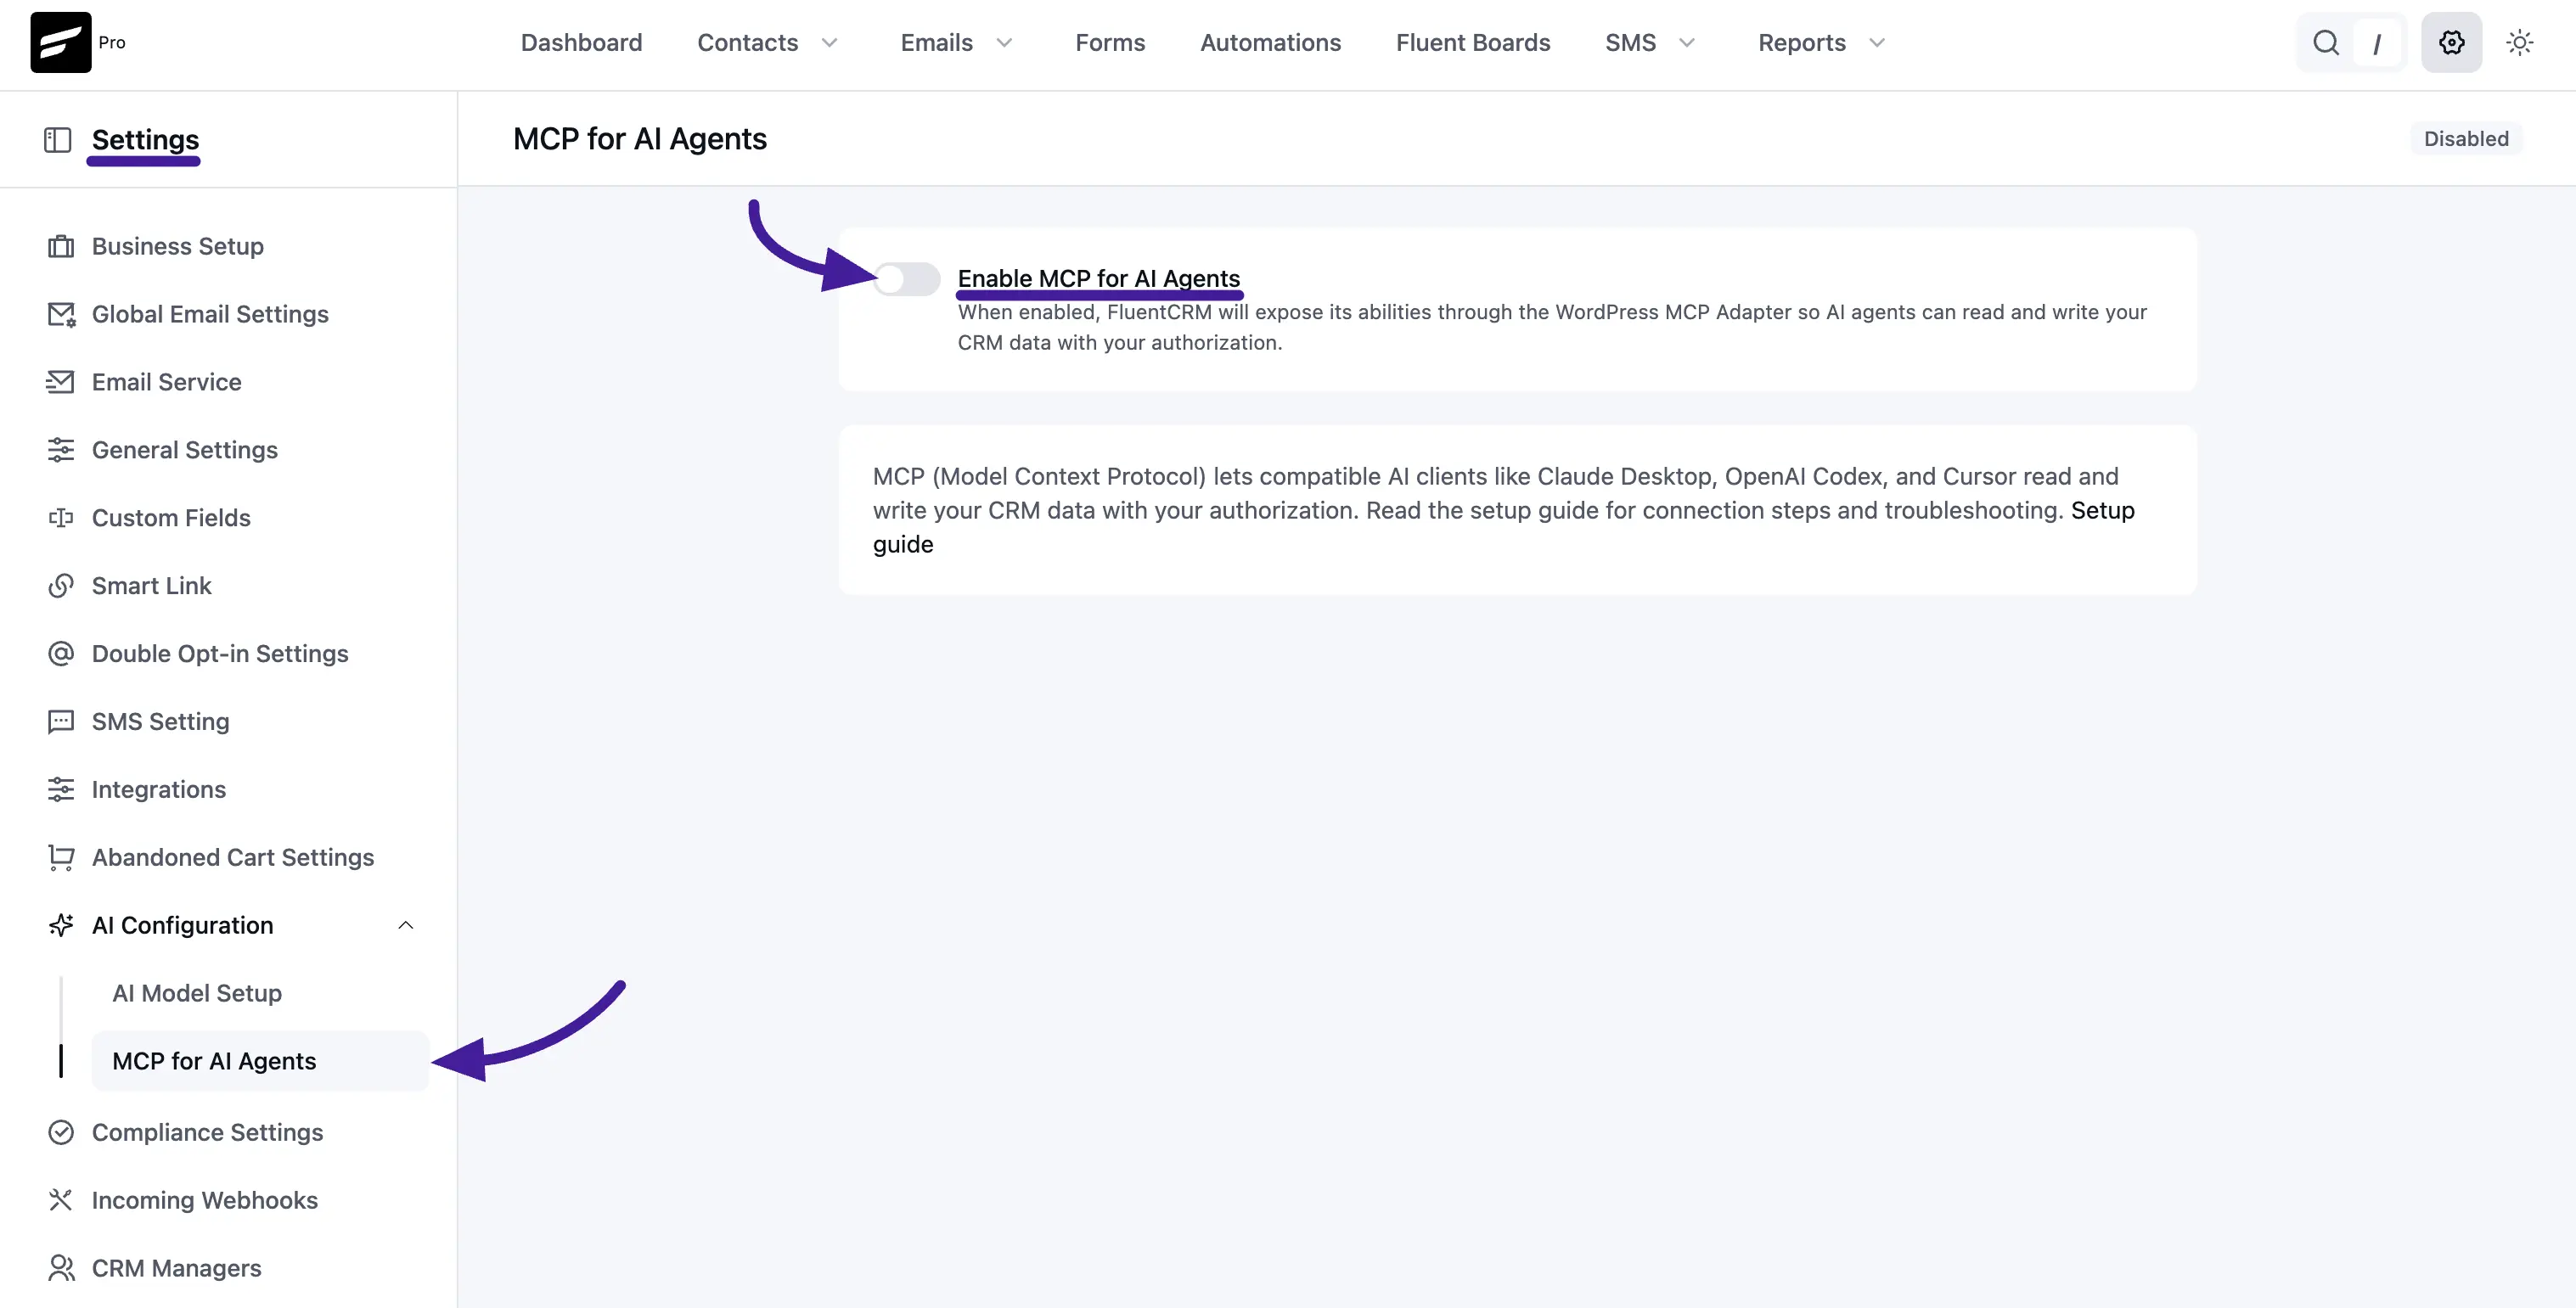
If you ever want to pause access for every connected AI client at once, just flip this toggle off. The endpoint stops responding to MCP requests immediately, no other changes needed.
Step 2: Install Fluent Toolkit
FluentCRM exposes its MCP tools through a small companion plugin called Fluent Toolkit. Until it's installed and active, the page shows an Adapter Required badge in the top-right and the Status panel offers an install option.
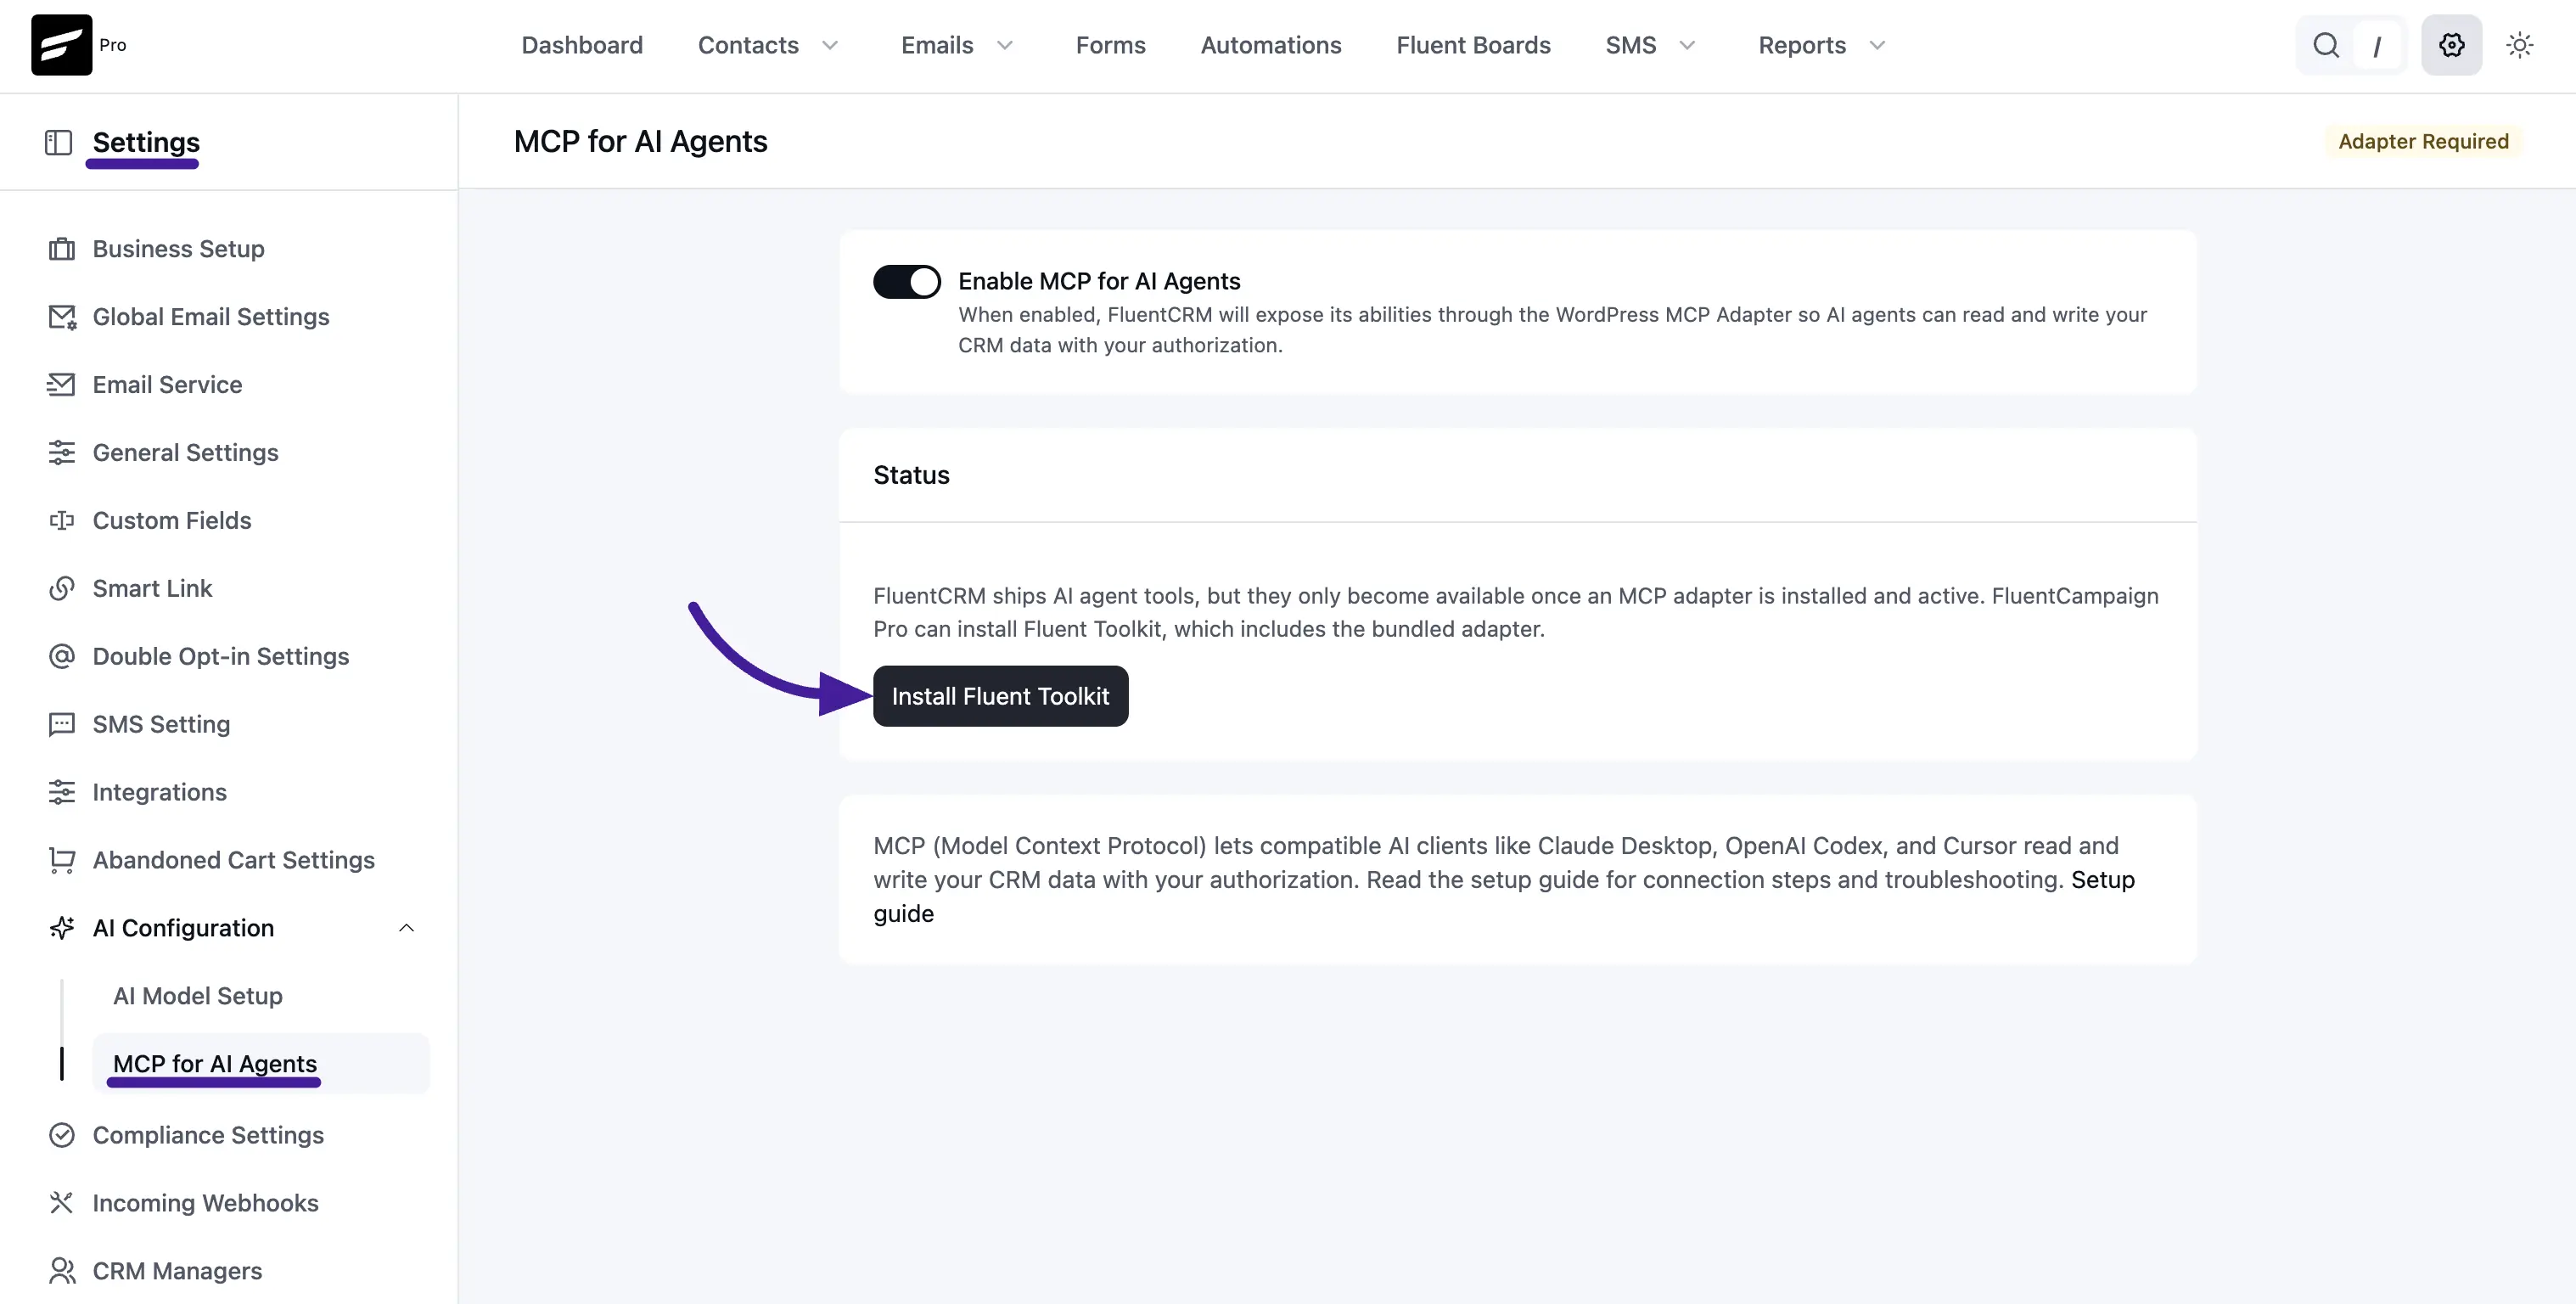
FluentCRM Pro users: Click Install Fluent Toolkit. WordPress installs and activates the plugin in the background, then the page refreshes into the connected state.
NOTE
Using the free version of FluentCRM? You won't see the one-click Install Fluent Toolkit button. Instead, you'll see a link to download the plugin from GitHub. Download the ZIP from the Fluent Toolkit GitHub repository, then upload it via Plugins → Add New → Upload Plugin and activate it. After activation, return to MCP for AI Agents and the page will flip into the connected state.
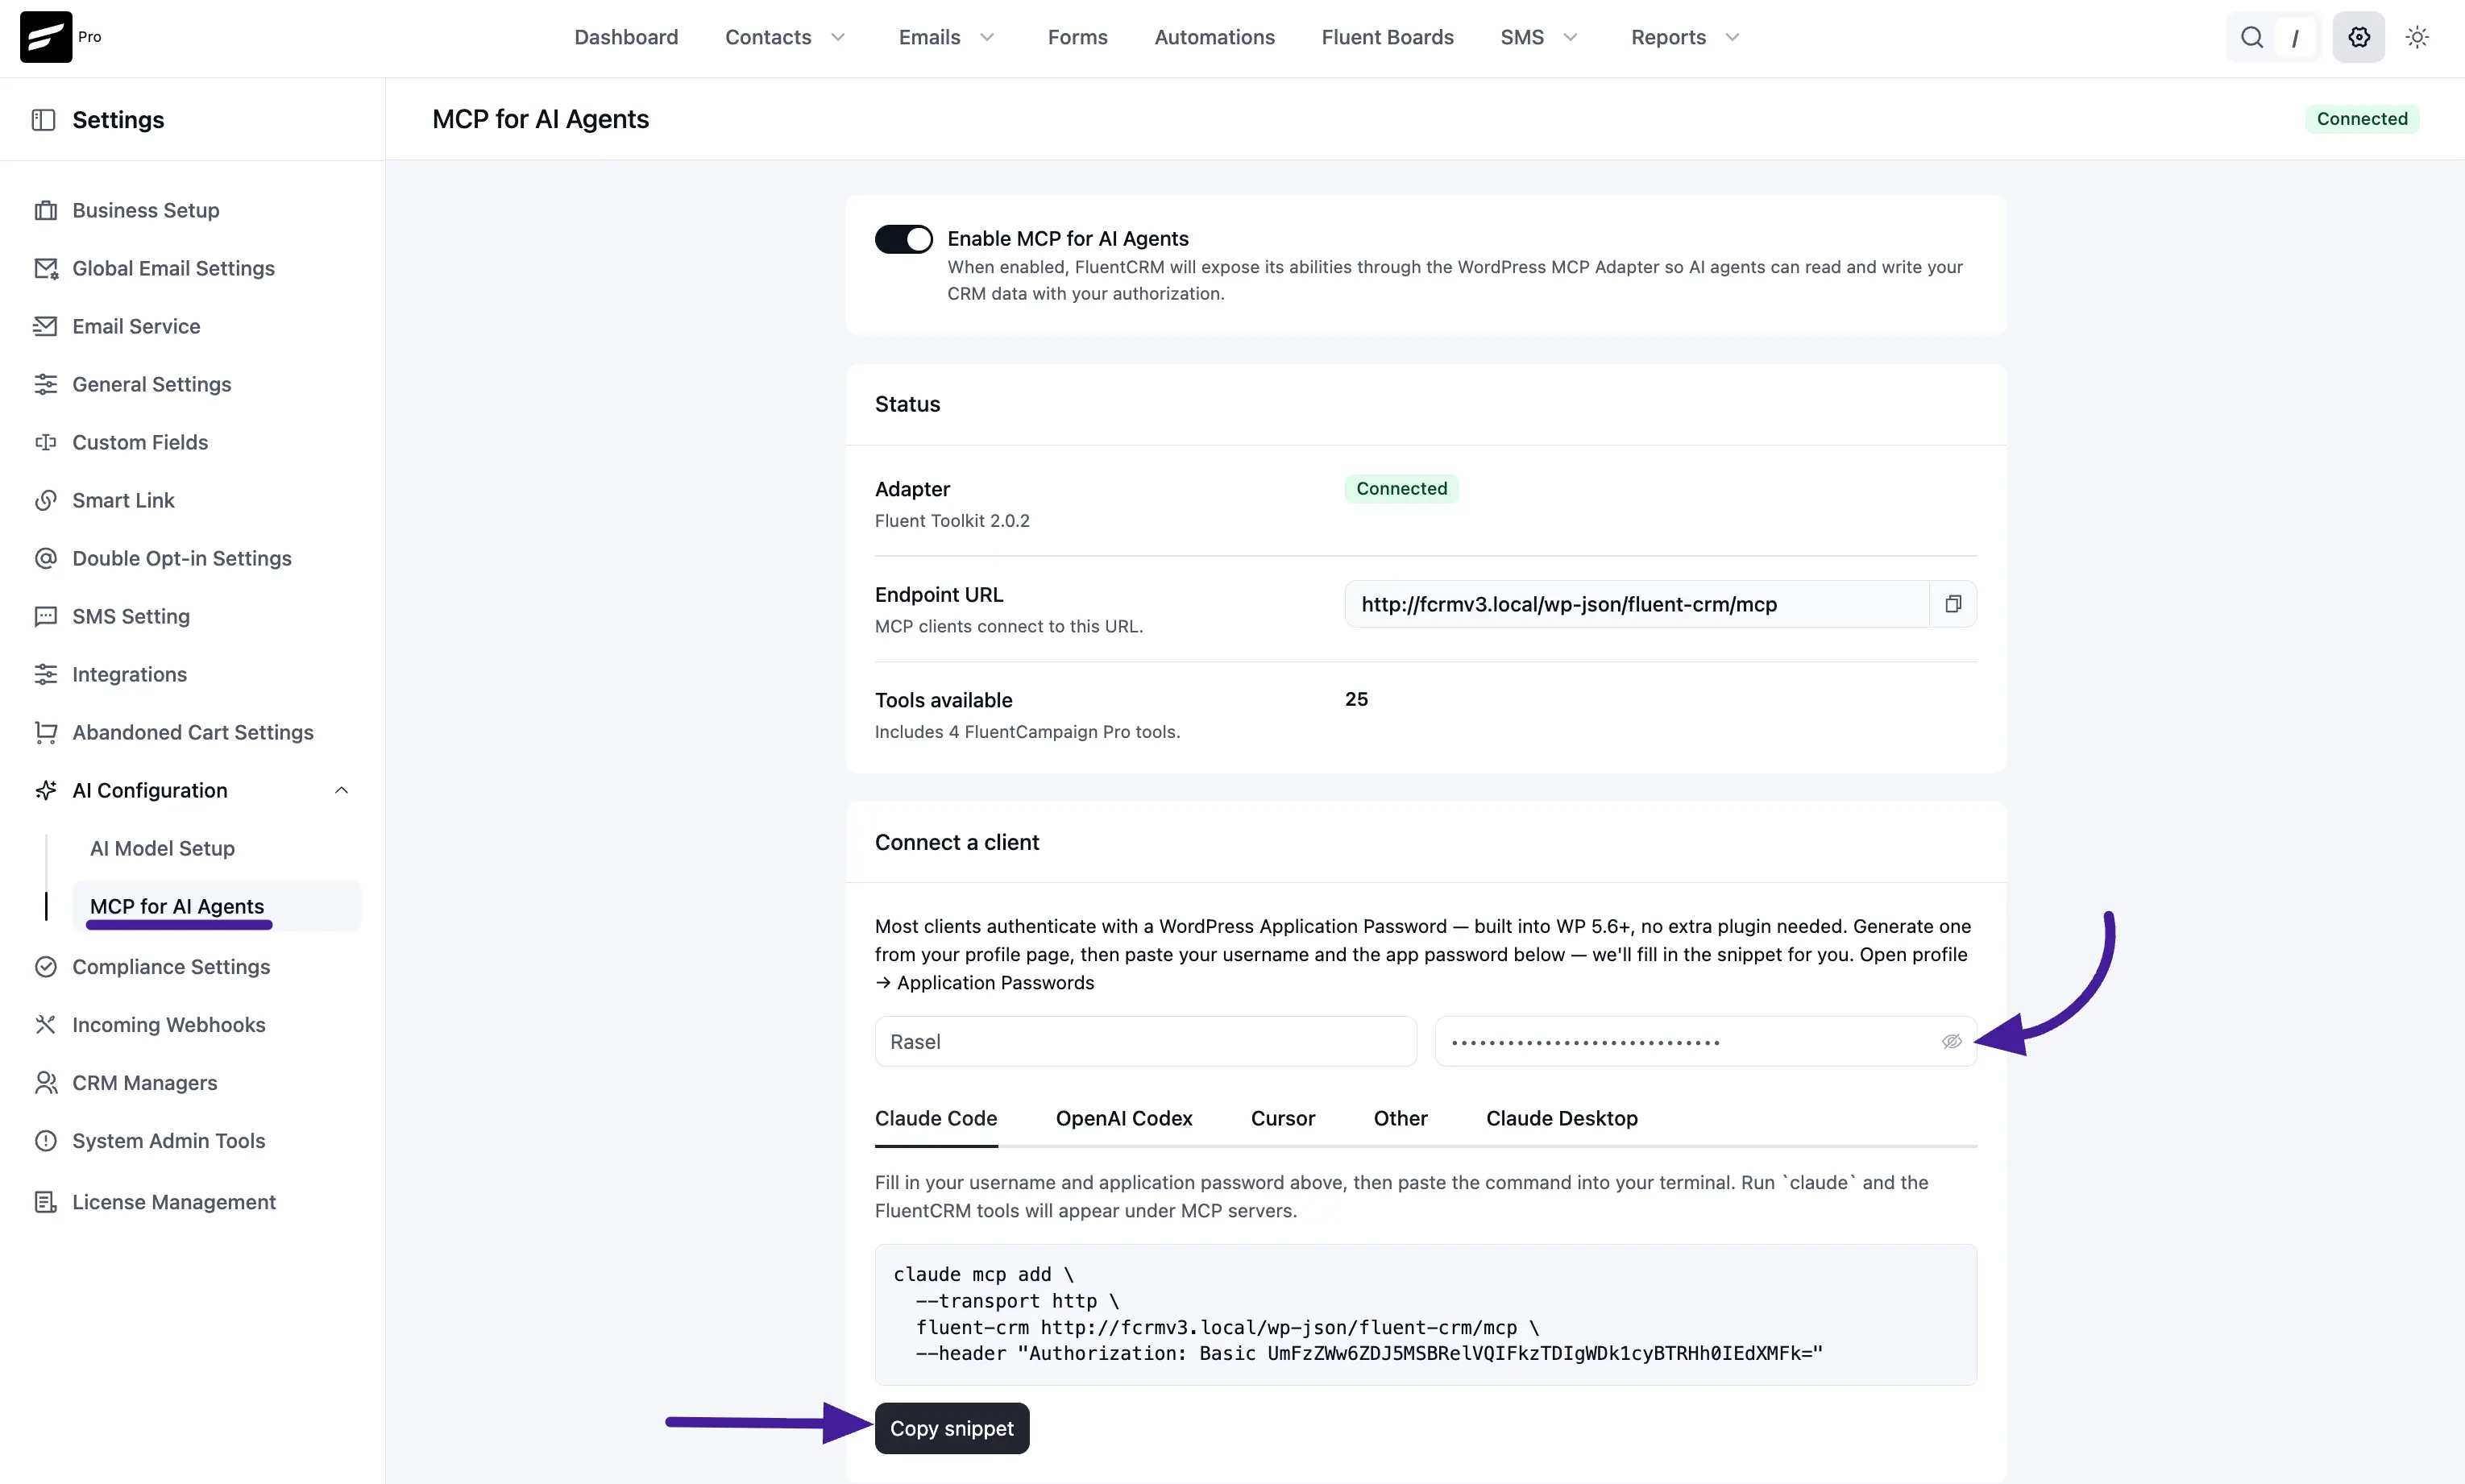
Step 3: Confirm the Status panel
Once the toggle is on, the Status panel shows three details you'll want to keep handy:
| Field | What it shows |
|---|---|
| Adapter | The installed Fluent Toolkit version (for example, Fluent Toolkit 2.0.2) along with a green Connected badge. |
| Endpoint URL | The address your AI client connects to, usually https://your-site.com/wp-json/fluent-crm/mcp. Click the copy icon to grab it in one click. |
| Tools available | Total number of MCP tools exposed (typically 25, including 4 FluentCampaign Pro tools when Pro is active). |
A green Connected badge in the top-right of the page is your confirmation that the adapter is talking to FluentCRM correctly. If the count next to Tools available is 0, the toggle in Step 2 likely isn't on yet.
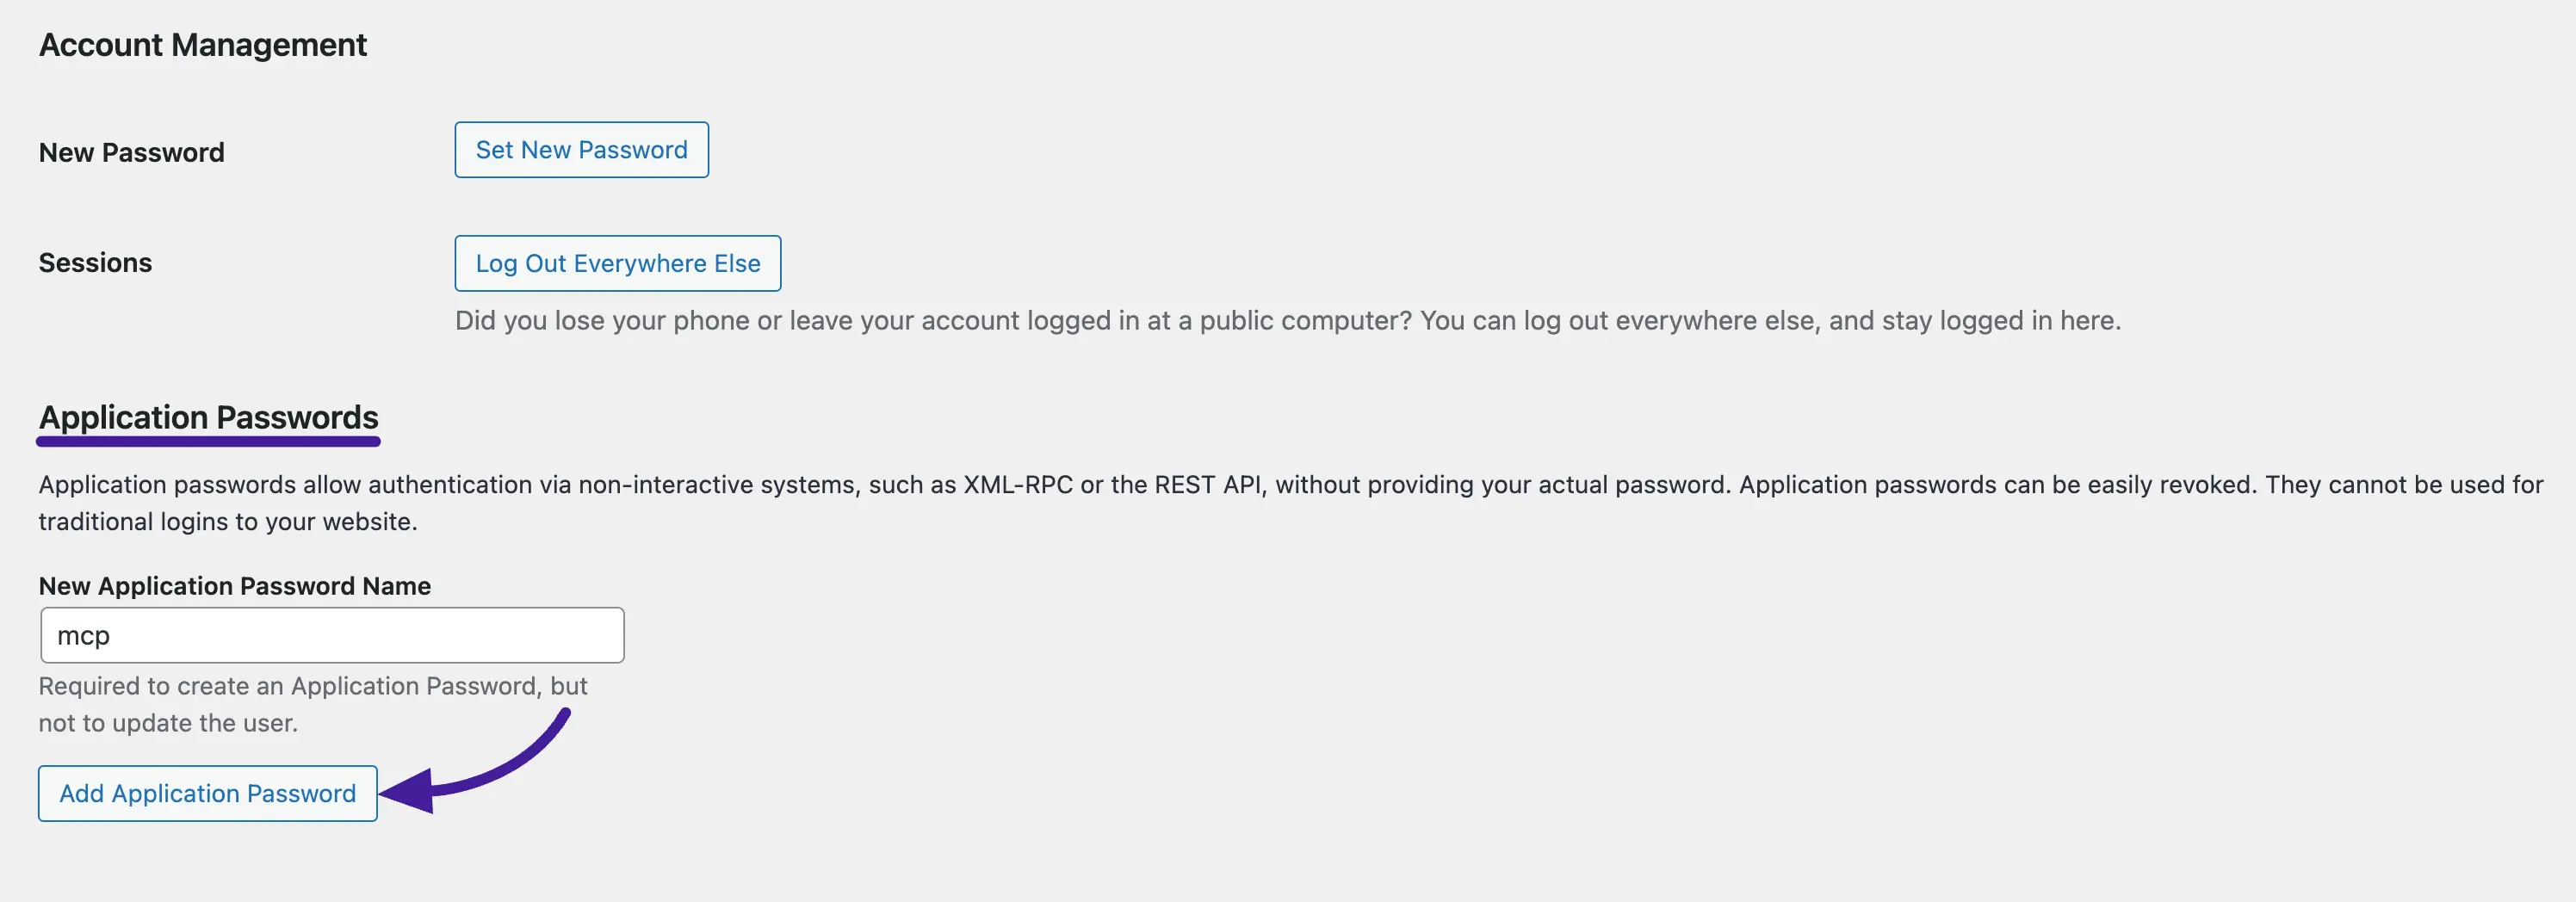
Step 4: Generate a WordPress Application Password
AI clients sign in using a WordPress Application Password. This is a feature built directly into WordPress 5.6 and later, so you don't need any extra plugin to use it. Each application gets its own password, which means you can revoke a single AI client without affecting your main login or any of your other tools.
To create one:
- In WordPress admin, go to Users → Profile and scroll down to the Application Passwords section.
- Enter a name that identifies the connection (for example,
mcp,Claude Desktop, orCursor). This name shows up in the table afterward so you can tell connections apart. - Click Add Application Password.
- WordPress generates a one-time password formatted like
xxxx xxxx xxxx xxxx xxxx xxxx. Click Copy and save it somewhere safe. This password is shown only once and cannot be retrieved later.

WARNING
If you lose the password before saving it, just revoke it from the same Application Passwords table and generate a fresh one. There's no way to view an old one again.
Step 5: Connect your AI client
Back on MCP for AI Agents, scroll to the Connect a client panel. FluentCRM will encode your credentials and pre-fill a ready-to-paste snippet for the AI client you pick.
- In the Username field, type the WordPress username you generated the password for.
- Paste the Application Password (with or without spaces, both work) into the password field.
- Pick the tab matching your AI client: Claude Code, OpenAI Codex, Cursor, Other, or Claude Desktop.
- Click Copy snippet.
WARNING
The generated snippet already contains your encoded credentials. Treat it like a password: never paste it into a public repository, a shared chat, or a screenshot.
Worked example: connecting Cursor
Here's the full Cursor flow as a worked example. The same idea applies to other clients, only the snippet format changes.
1. Open Cursor's MCP settings. In Cursor, open the command palette and search for Cursor Settings, then go to Tools & MCPs in the left sidebar. Under Installed MCP Servers, click New MCP Server.

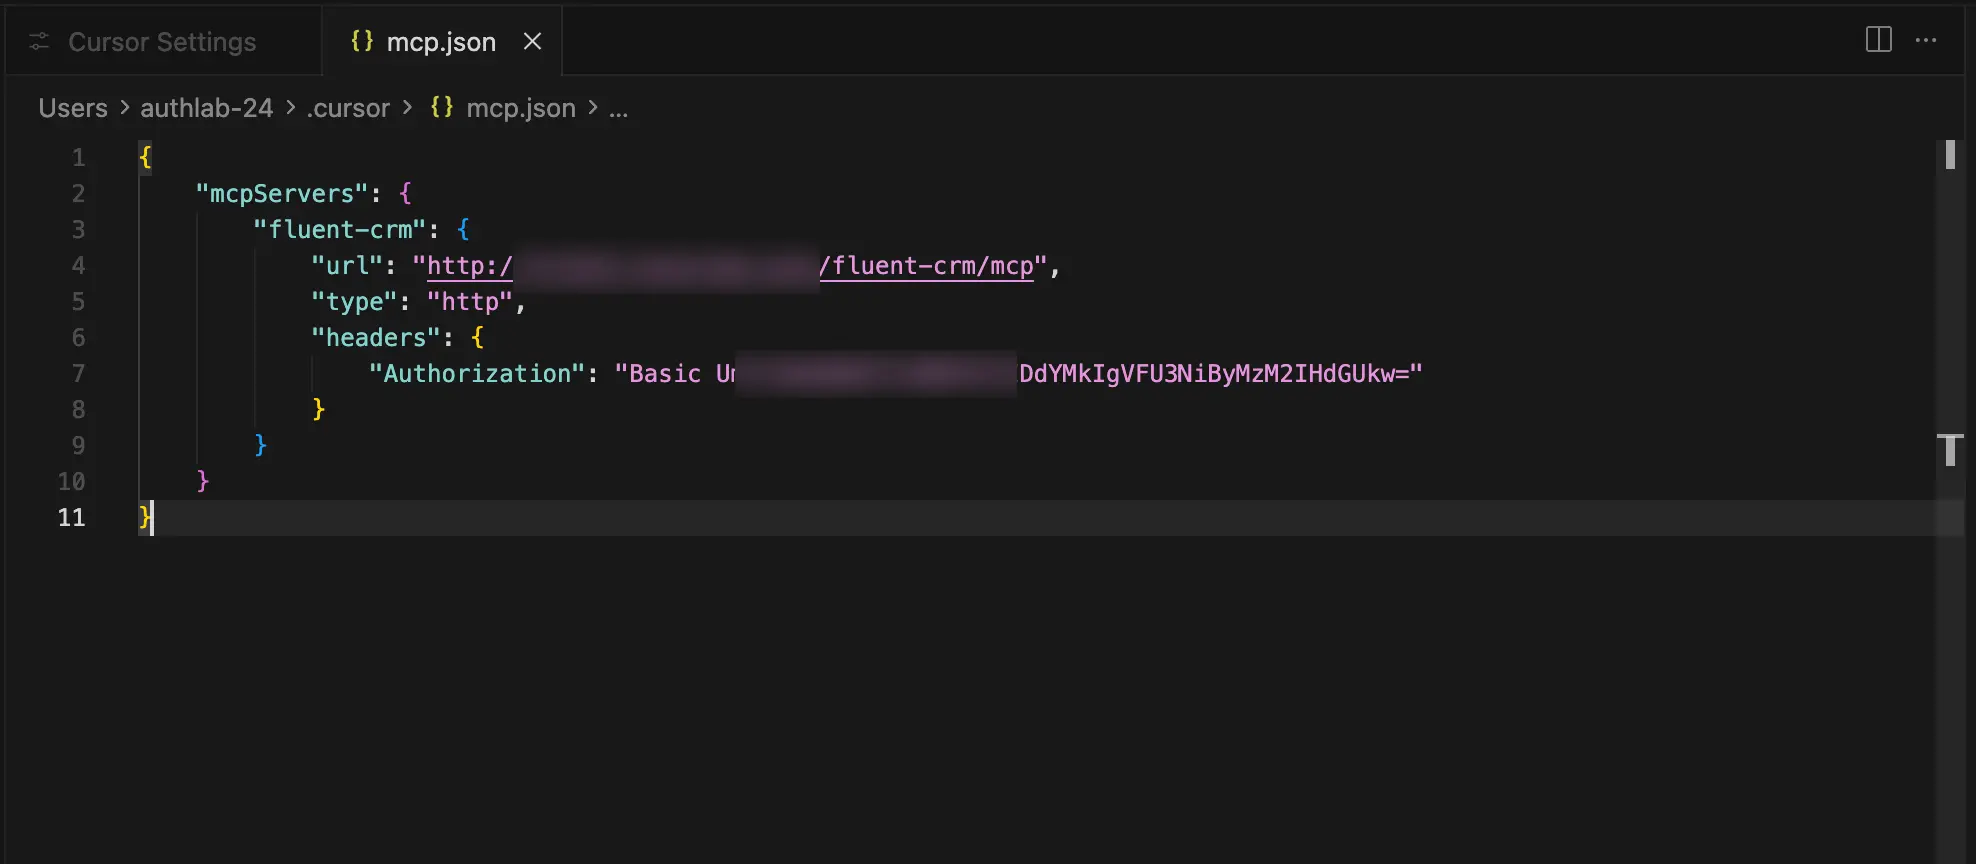
2. Paste the snippet into mcp.json. Cursor opens an editor for the mcp.json config file. Copy the snippet from the Cursor tab in FluentCRM's Connect a client panel and paste it in. It looks like this:
json
{
  "mcpServers": {
    "fluent-crm": {
      "url": "https://your-site.com/wp-json/fluent-crm/mcp",
      "type": "http",
      "headers": {
        "Authorization": "Basic <encoded-credentials>"
      }
    }
  }
}
3. Save and reload. Save mcp.json and reload Cursor. Open Tools & MCPs again, and you'll see fluent-crm in your Installed MCP Servers list with all available tools listed underneath:
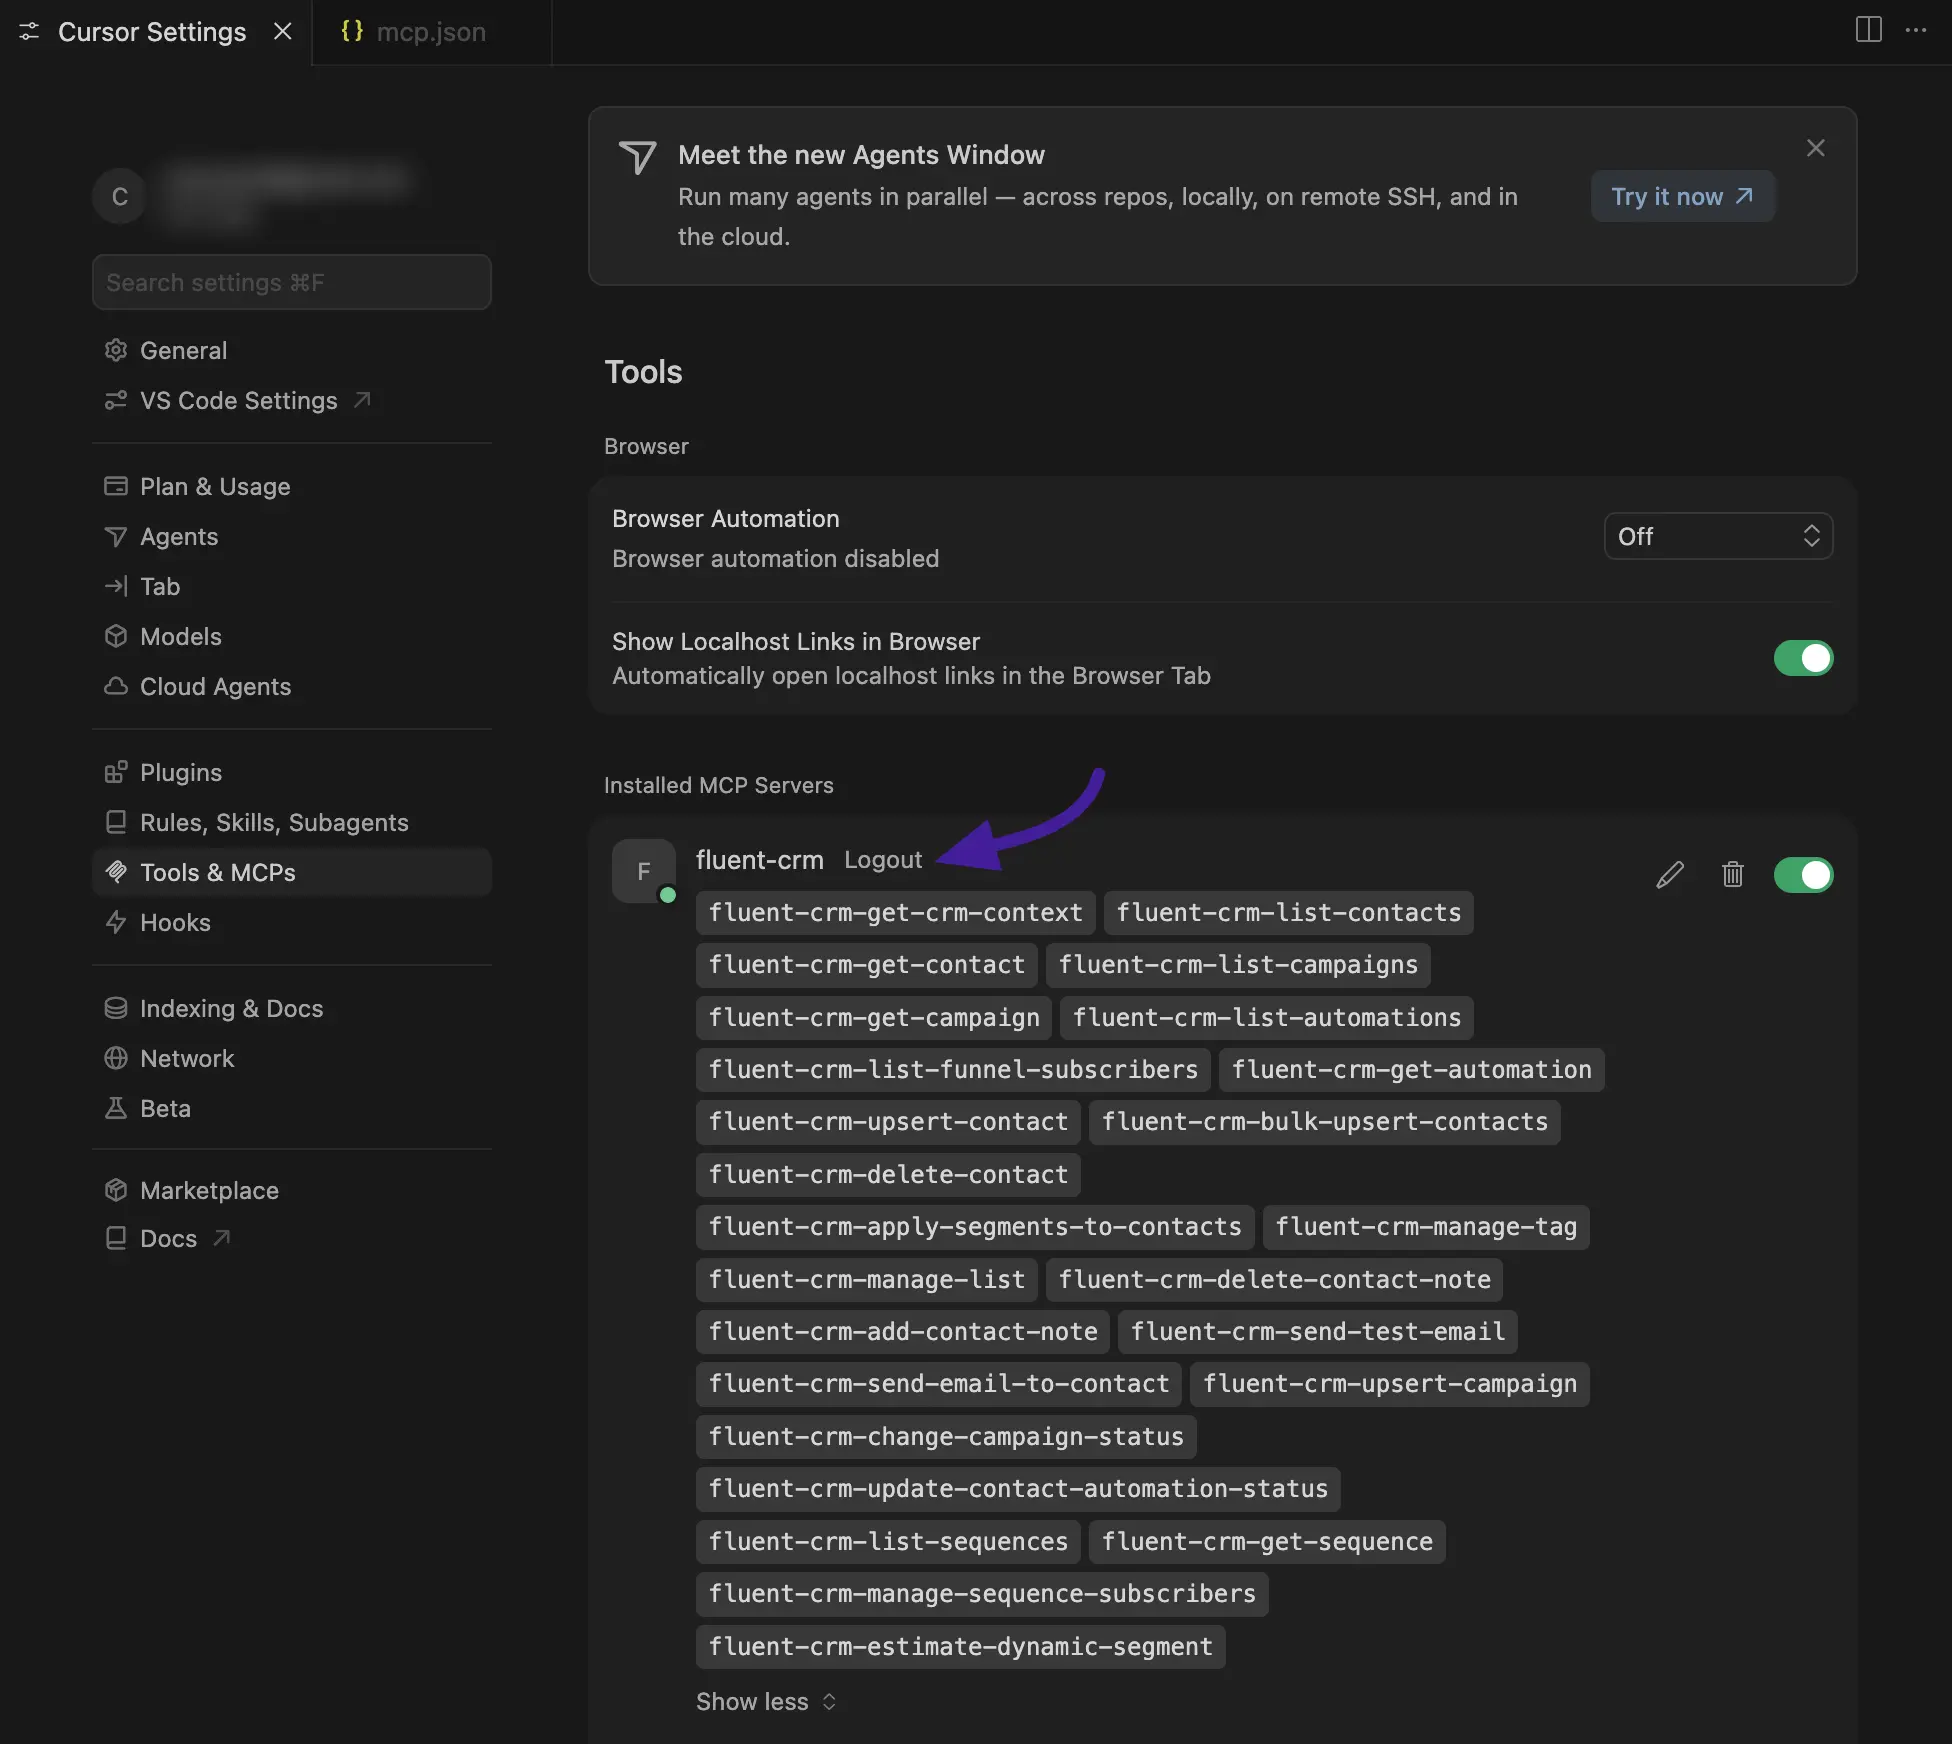
That's it. Cursor's AI can now talk to your FluentCRM.
Other AI clients
The other tabs work the same way, only the snippet format changes to match the client:
- Claude Code: A terminal command (
claude mcp add ...) you paste into your terminal. After it runs, the FluentCRM tools appear in your nextclaudesession. - Claude Desktop: A snippet for
claude_desktop_config.json. Paste it into the file at the path Anthropic documents for your OS, then restart Claude Desktop. - OpenAI Codex: A configuration block for Codex's settings. Follow the instructions shown under the snippet on the OpenAI Codex tab.
- Other: Generic configuration block you can adapt for any MCP-compliant client.
In every case, the workflow is the same: fill in the username and password fields, pick the right tab, copy the snippet, and paste it into the AI client where it expects an MCP server config.
Step 6: Verify it's working
Open your AI client and ask it something only FluentCRM would know. For example:
"Get me the last 5 contacts from CRM."
The agent calls your endpoint, fetches the data, and replies with the actual contacts (name, email, status, type, source, and more):
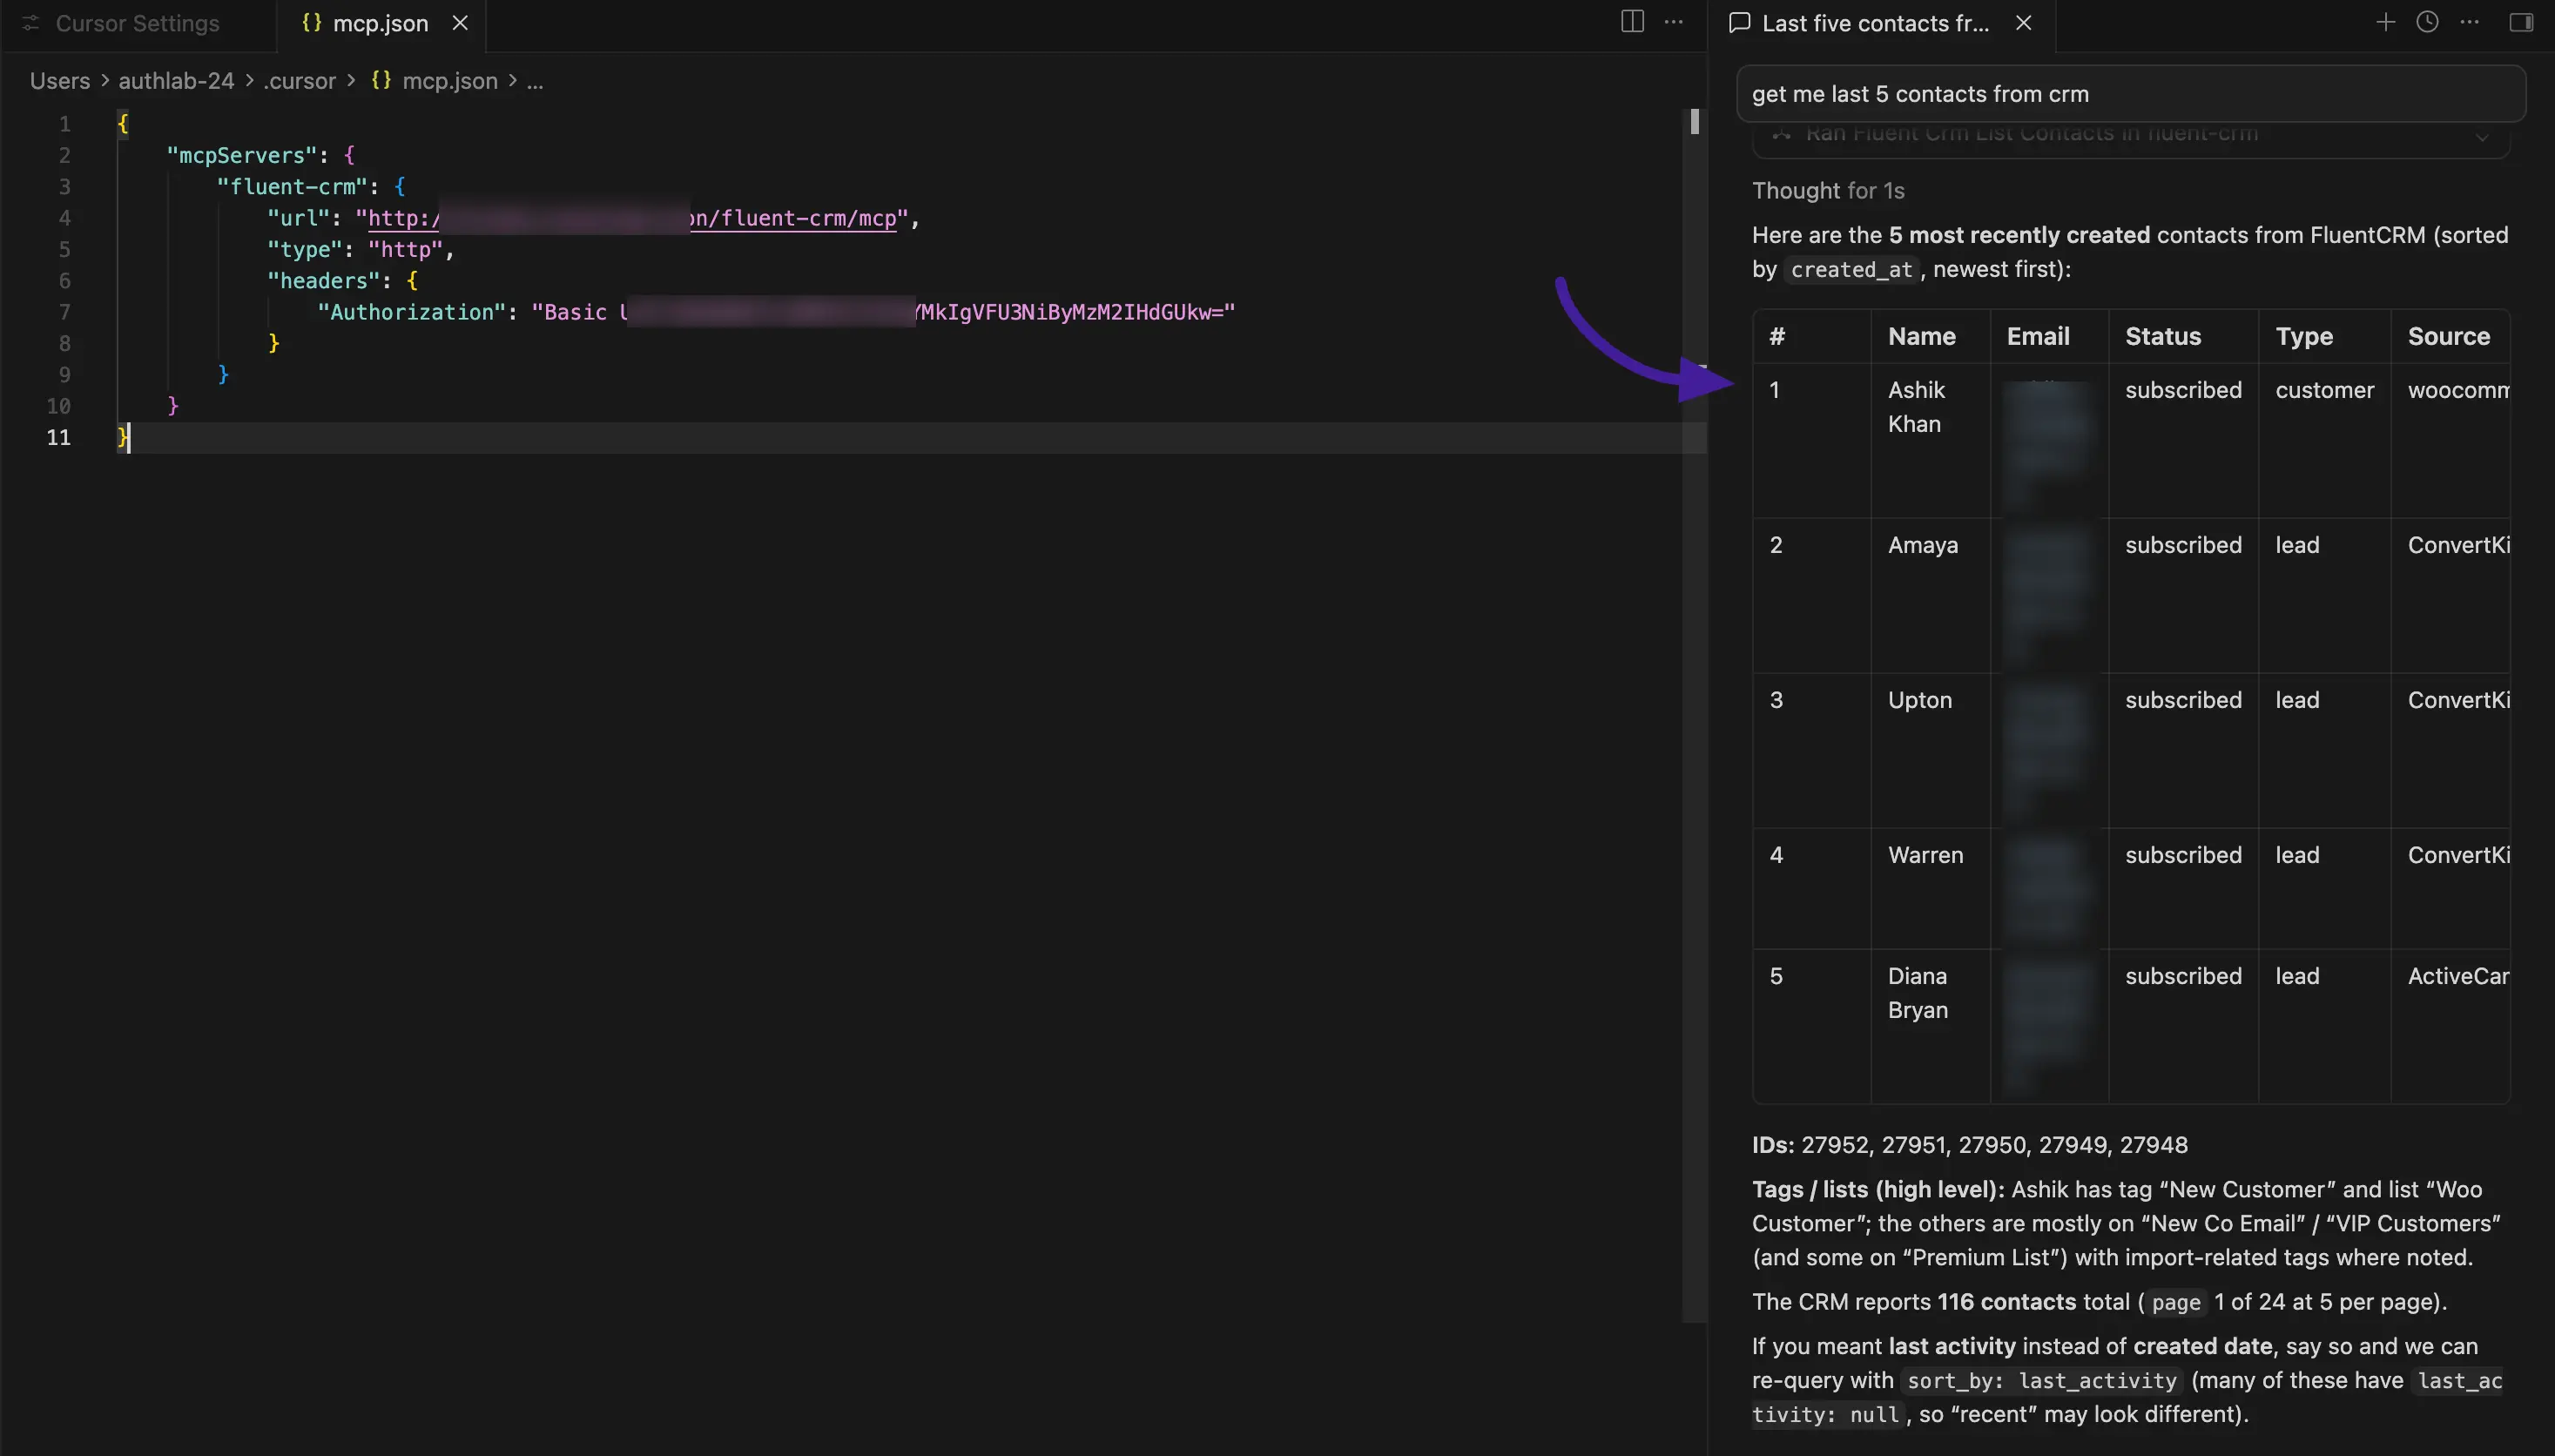
If you see real contacts in the reply, your connection is live and authenticated. From here, you can ask the AI to perform any of the actions in the next section.
What your AI agent can actually do
Once connected, your AI client gets access to 25 FluentCRM tools (including 4 FluentCampaign Pro tools when Pro is active). You don't call these by name. The AI picks the right tool based on what you ask in plain language. Here's a friendly overview of what's available, grouped by area.
Contacts
Tools that look up, create, edit, or remove people in your CRM.
- List contacts (
fluent-crm-list-contacts) — Search and filter contacts by name, status, tag, list, or any other field. - Get contact (
fluent-crm-get-contact) — Pull a single contact's full profile, including custom fields and notes. - Upsert contact (
fluent-crm-upsert-contact) — Create a new contact, or update an existing one if the email already exists. - Bulk upsert contacts (
fluent-crm-bulk-upsert-contacts) — Add or update many contacts in one call (handy for imports). - Delete contact (
fluent-crm-delete-contact) — Permanently remove a contact from your CRM. - Add contact note (
fluent-crm-add-contact-note) — Attach a note to a contact's timeline. - Delete contact note (
fluent-crm-delete-contact-note) — Remove a note you no longer need.
Example prompts:
- "Show me all subscribed contacts tagged 'VIP Customer' who joined last month."
- "Add a note on Sarah Lee saying she requested a refund on May 1st."
- "Update
[email protected], set their first name to John and tag them as 'Webinar Attendee'."
Lists, tags, and segments
Tools for organizing your audience.
- Manage tag (
fluent-crm-manage-tag) — Create, rename, or delete tags. - Manage list (
fluent-crm-manage-list) — Create, rename, or delete lists. - Apply segments to contacts (
fluent-crm-apply-segments-to-contacts) — Add or remove lists and tags for one or many contacts at once. - Estimate dynamic segment (
fluent-crm-estimate-dynamic-segment) — Preview how many contacts match a dynamic-segment rule before you save it.
Example prompts:
- "How many contacts would match a dynamic segment of subscribed customers who haven't opened an email in 90 days?"
- "Remove the 'Trial' tag from everyone who has the 'Paid Customer' tag."
Campaigns
Tools for one-off email broadcasts.
- List campaigns (
fluent-crm-list-campaigns) — Browse all campaigns with their status and send dates. - Get campaign (
fluent-crm-get-campaign) — View one campaign's content, schedule, and stats (sent, opened, clicked). - Upsert campaign (
fluent-crm-upsert-campaign) — Draft a new campaign or update an existing draft. - Change campaign status (
fluent-crm-change-campaign-status) — Schedule, send, pause, or archive a campaign. - Send test email (
fluent-crm-send-test-email) — Send a test version of a campaign to yourself or a teammate. - Send email to contact (
fluent-crm-send-email-to-contact) — Send a one-off transactional email to a single contact.
Example prompts:
- "Show me the open and click rates for my last 3 campaigns."
- "Draft a new campaign called 'June Newsletter' for the Newsletter list and save it as a draft."
Automations (funnels)
Tools for your automation funnels and the people enrolled in them.
- List automations (
fluent-crm-list-automations) — Browse every automation funnel and its current status. - Get automation (
fluent-crm-get-automation) — Inspect a specific automation's trigger, steps, and stats. - List funnel subscribers (
fluent-crm-list-funnel-subscribers) — See who's currently enrolled in a specific automation. - Update contact automation status (
fluent-crm-update-contact-automation-status) — Pause, resume, or remove a contact from an automation.
Example prompts:
- "Which contacts are currently in the 'New Customer Welcome' automation?"
- "Remove
[email protected]from the 'Abandoned Cart Recovery' automation."
Email sequences
Tools for your drip-style sequences.
- List sequences (
fluent-crm-list-sequences) — Browse all email sequences. - Get sequence (
fluent-crm-get-sequence) — View a sequence's emails, timing, and stats. - Manage sequence subscribers (
fluent-crm-manage-sequence-subscribers) — Enroll or remove contacts from a sequence.
Example prompts:
- "Enroll every contact tagged 'Free Trial' into the 'Onboarding Sequence'."
Workspace context
A single tool that gives the AI a snapshot of your CRM, used when it needs orientation.
- Get CRM context (
fluent-crm-get-crm-context) — Returns totals (contacts, campaigns, automations), recent activity, and key metadata. The AI calls this automatically when it needs context about your workspace.
Security & revoking access
Application Passwords are scoped to a single connection, so revoking one only disconnects that AI client. Your main WordPress login and any other connected apps stay untouched.
- Revoke an MCP connection: Go to Users → Profile → Application Passwords, find the row by name, and click Revoke.
- Disable MCP entirely: Turn off the Enable MCP for AI Agents toggle on the settings page. The endpoint stops responding to MCP requests immediately.
- Rotate credentials: Revoke the old password, generate a fresh one, then re-copy the snippet from the Connect a client panel and paste it back into your AI client.
TIP
Give each AI client its own Application Password (one for Cursor, one for Claude Desktop, and so on). That way you can revoke a single client without breaking the others.
Troubleshooting
- "Adapter Required" badge still showing after install. Hard-refresh the settings page. If it persists, go to Plugins and confirm Fluent Toolkit is both installed and Active.
- Tools available shows 0. Make sure the Enable MCP for AI Agents toggle is on. The count refreshes the moment the adapter reconnects.
- "Unauthorized" error in the AI client. The username or Application Password is wrong. Re-generate the password (copy it immediately) and paste it back into the Connect a client panel, then re-copy the snippet into your AI client.
- FluentCRM tools not appearing in the AI client. Restart the client fully after running the connect command or saving
mcp.json. Some clients (like Claude Code) need a full restart, not just a reload. - Connection works locally but not in production. Confirm the Endpoint URL in Status uses the same scheme (
httporhttps) and domain your AI client is configured with. WordPress Application Passwords also require a reachable REST API at/wp-json/.