Appearance
AI Model Setup
FluentCRM v3 adds a built-in AI layer that helps you write better emails and understand your contacts faster. Once you connect an AI provider, two things light up across the CRM:
- In the email editor, you can generate a full email from a prompt, or polish existing copy with one-click actions like Rewrite, Shorten, Expand, and Fix Grammar.
- In contact profiles, you can generate an AI Summary that distils a contact's engagement, purchases, course activity, and support history into a short, decision-ready report.
You bring your own API key (OpenAI, Anthropic Claude, or Google Gemini), so the AI calls go directly from your WordPress site to the provider you choose. No third-party proxy, no extra subscription, no AI traffic flowing through WPManageNinja servers.
Open AI Model Setup
From your WordPress admin, go to FluentCRM → Settings → AI Configuration → AI Model Setup. Everything you need to wire up AI for both the email editor and contact summaries lives on this one page.
Step 1: Enable AI
Switch on the Enable AI toggle at the top of the page. The helper text under the toggle reads: "When enabled, AI will be available in contact summaries and the email editor."
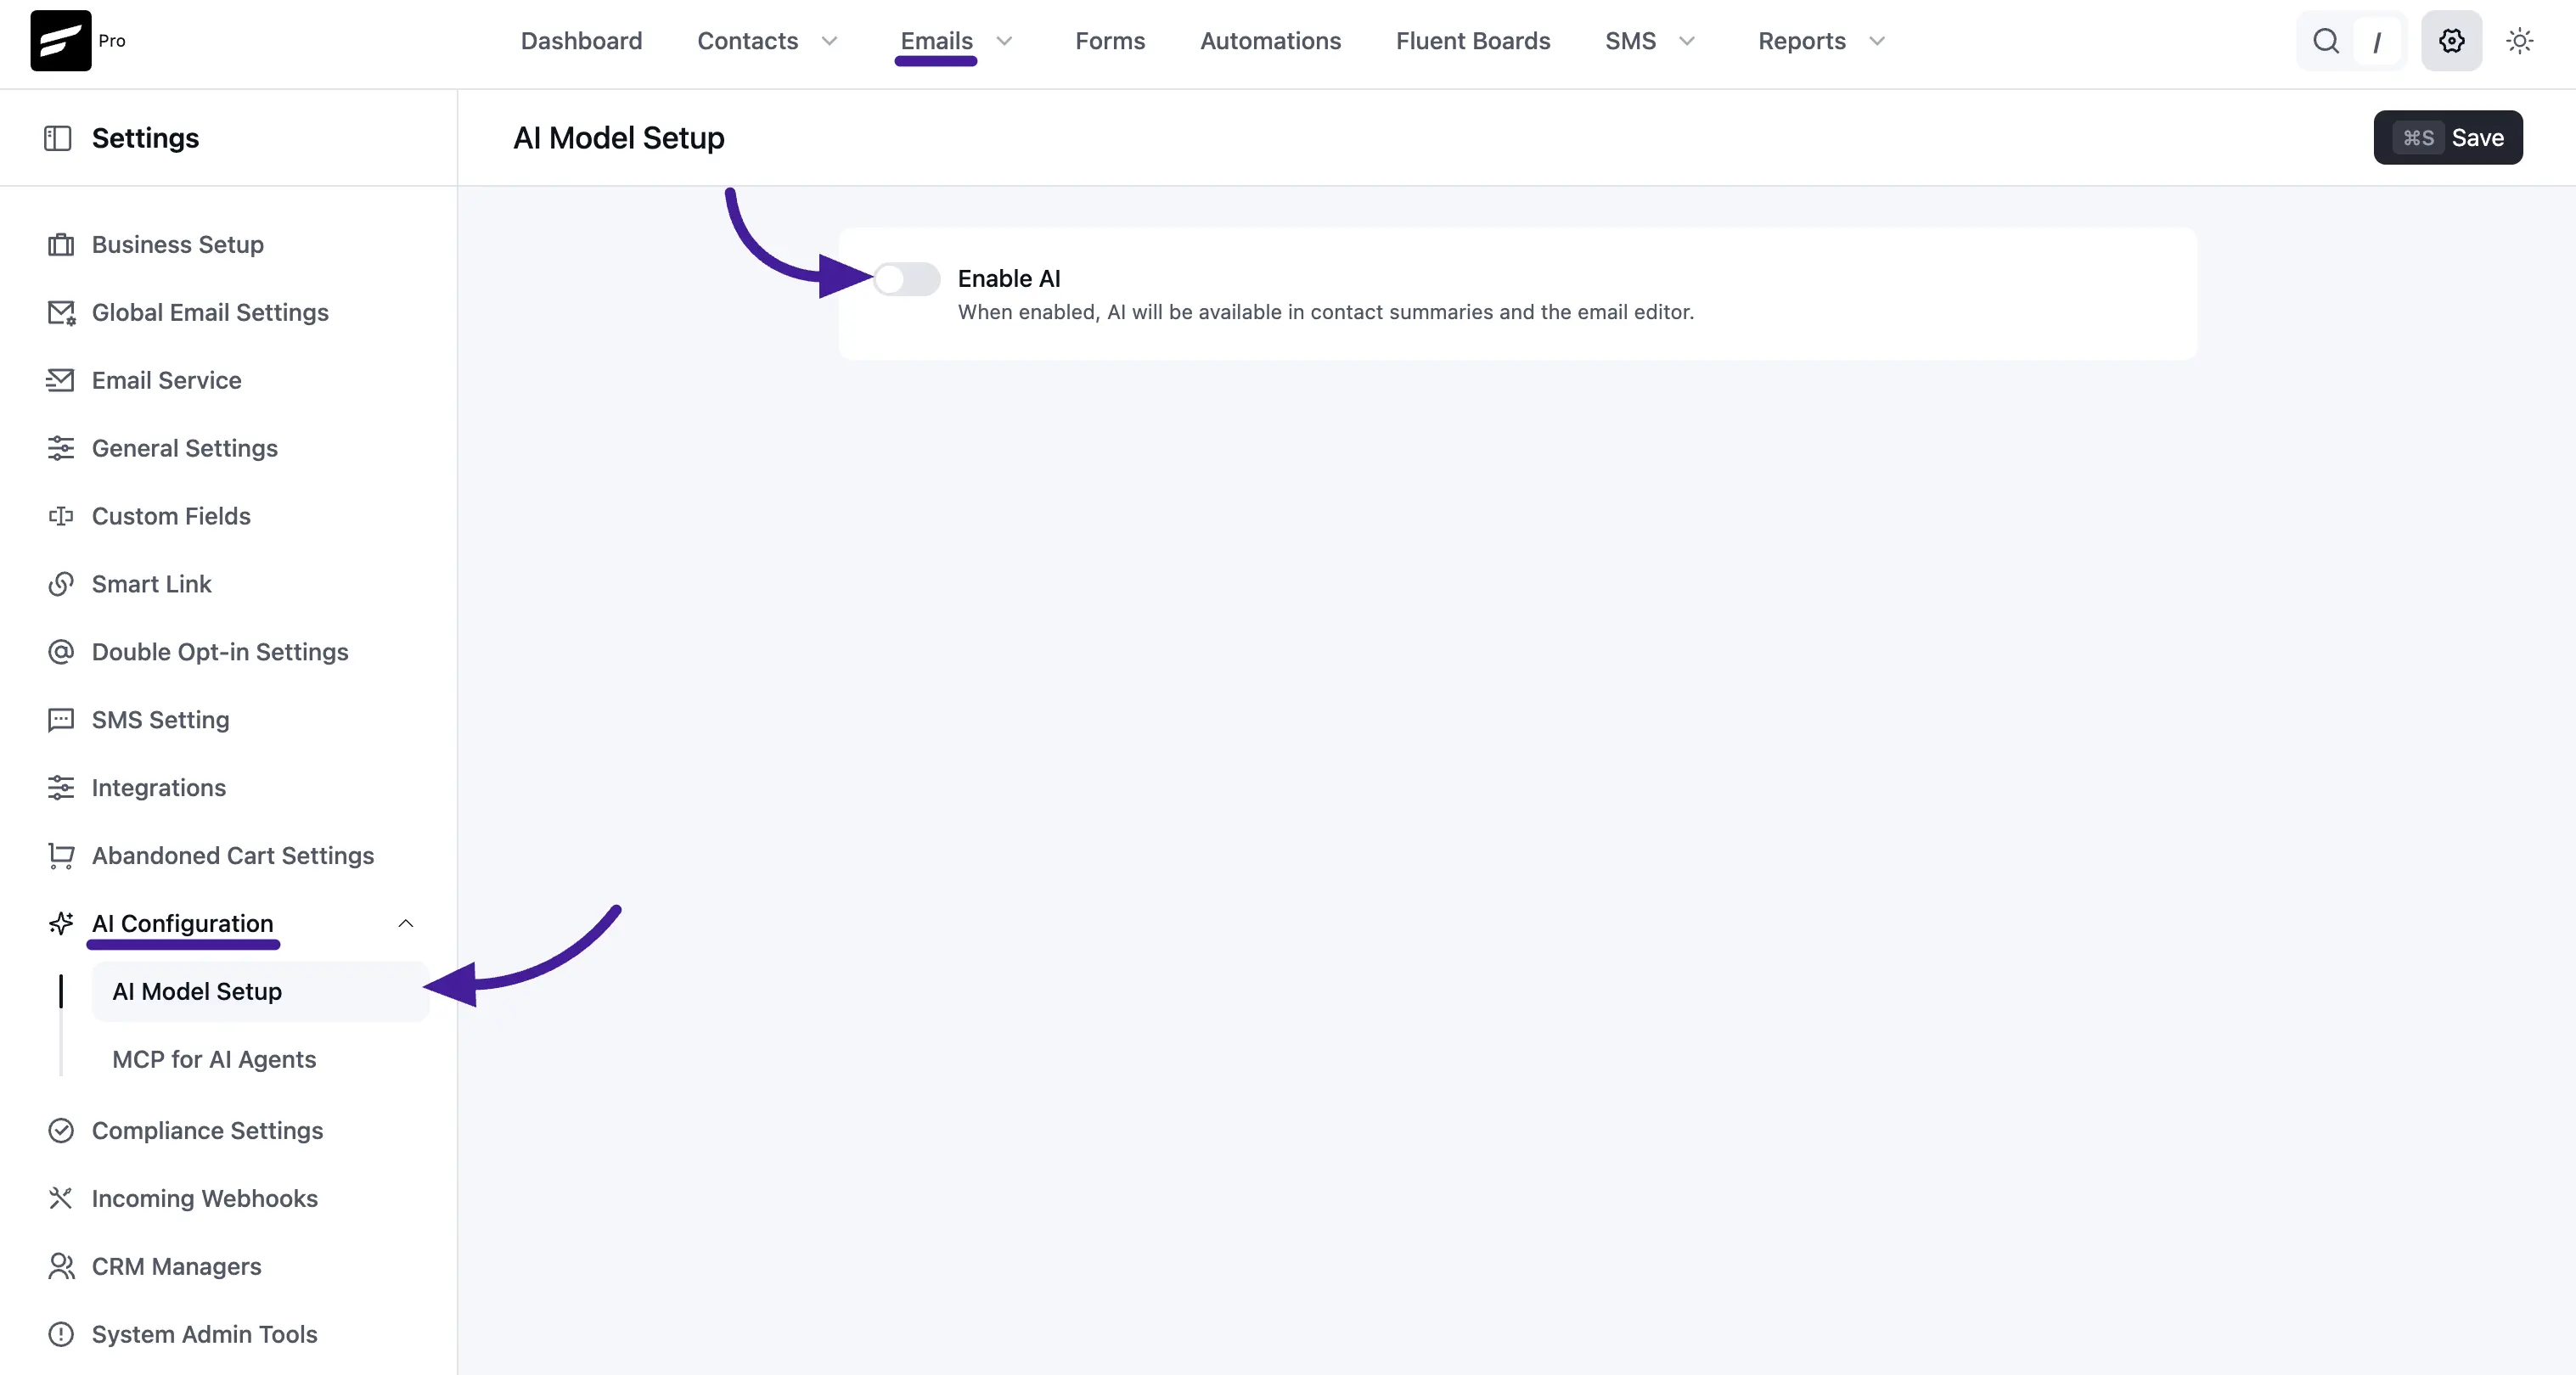
The toggle is the master switch. If it's off, the AI Summary button on contact profiles and the AI Writing options in the email editor stay hidden. Turn it on and the rest of the configuration fields appear.
Step 2: Choose a provider and model
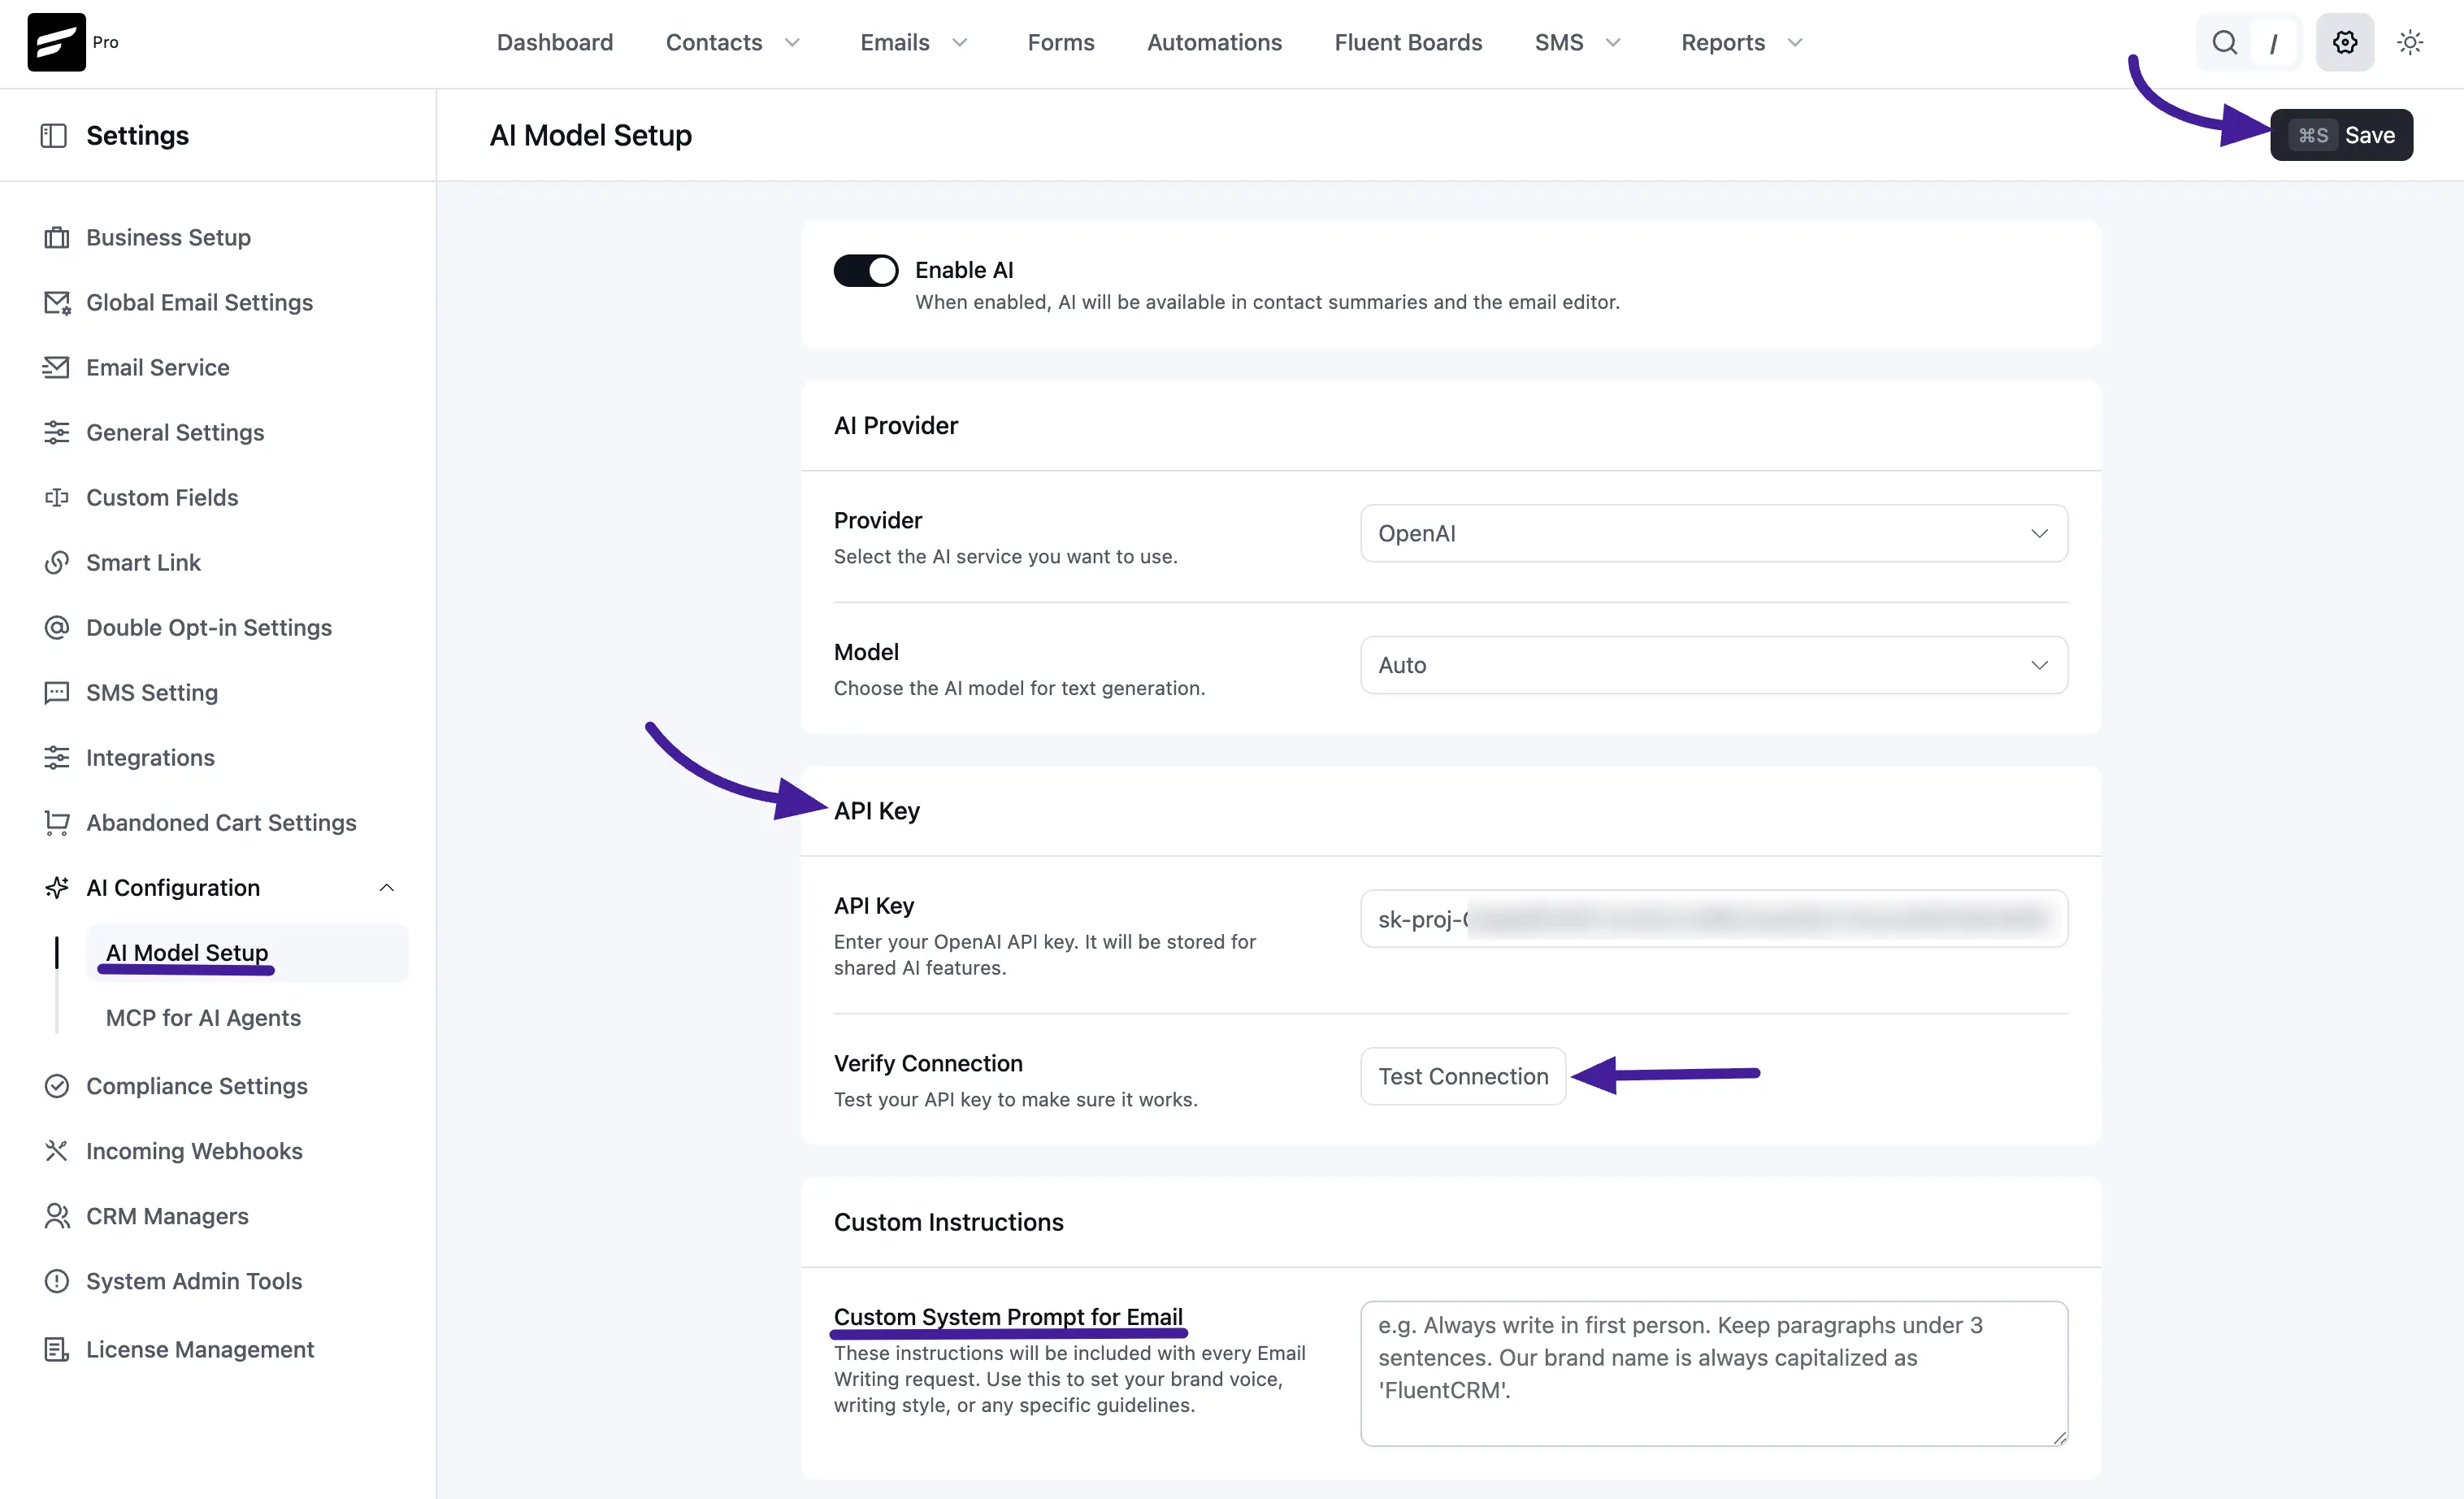
Once AI is enabled, the AI Provider panel appears. FluentCRM currently supports three providers, and you can switch between them at any time:
- OpenAI — GPT-4o, GPT-4.1, GPT-3.5, and other ChatGPT models.
- Anthropic Claude — Claude 3.x family, including Sonnet and Opus.
- Google Gemini — Gemini 1.5 Pro and Flash.
Pick your provider from the Provider dropdown, then choose a Model for text generation. If you leave the model on Auto (Recommended), FluentCRM picks a sensible default for the provider you selected, which is a good starting point when you're not sure which model fits best.
Step 3: Add your API key and test the connection
Scroll down to the API Key panel and paste the API key from your provider account. The key is stored as an encrypted FluentCRM option in your own database, and the key field masks the value so it isn't visible in plain text afterward.
Click Test Connection under Verify Connection to make sure the key works. FluentCRM sends a small probe to the provider with the model you selected, and shows a success or error toast in the bottom-right of the screen.
TIP
Make sure billing is active on your provider account. Most providers reject requests from accounts without a valid payment method on file, even when the key looks correct.
Where to get an API key
- OpenAI: Sign in at platform.openai.com and create a key under API keys.
- Anthropic Claude: Sign in at console.anthropic.com and create a key under API Keys.
- Google Gemini: Sign in at aistudio.google.com and create one under Get API key.
Step 4 (optional): Set a custom system prompt for email
The Custom Instructions panel includes a Custom System Prompt for Email field. Anything you write here gets injected into every email-writing request as a system prompt, which is how you teach the AI your brand voice, writing rules, and any "do this / don't do this" guardrails.
A few examples of what works well here:
text
Always write in first person.
Keep paragraphs under 3 sentences.
Our brand name is always capitalized as "FluentCRM".
Avoid superlatives like "amazing" or "revolutionary".
Default tone: friendly and direct, like a knowledgeable colleague.
You don't have to fill this in to use AI Writing, but a short, specific custom prompt makes a huge difference in how on-brand the generated copy feels.
Step 5: Save your settings
Click Save in the top-right of the page. Your provider, model, API key, and custom instructions are stored together.
From here, AI is live across FluentCRM. The next sections show where you'll actually use it.
Where you'll use AI in FluentCRM
Once AI is configured, you'll see two main surfaces inside the CRM.
Write with AI block (generate a full email)
In the email editor, click the + block inserter and search for "write with ai". Pick the Write with AI block.
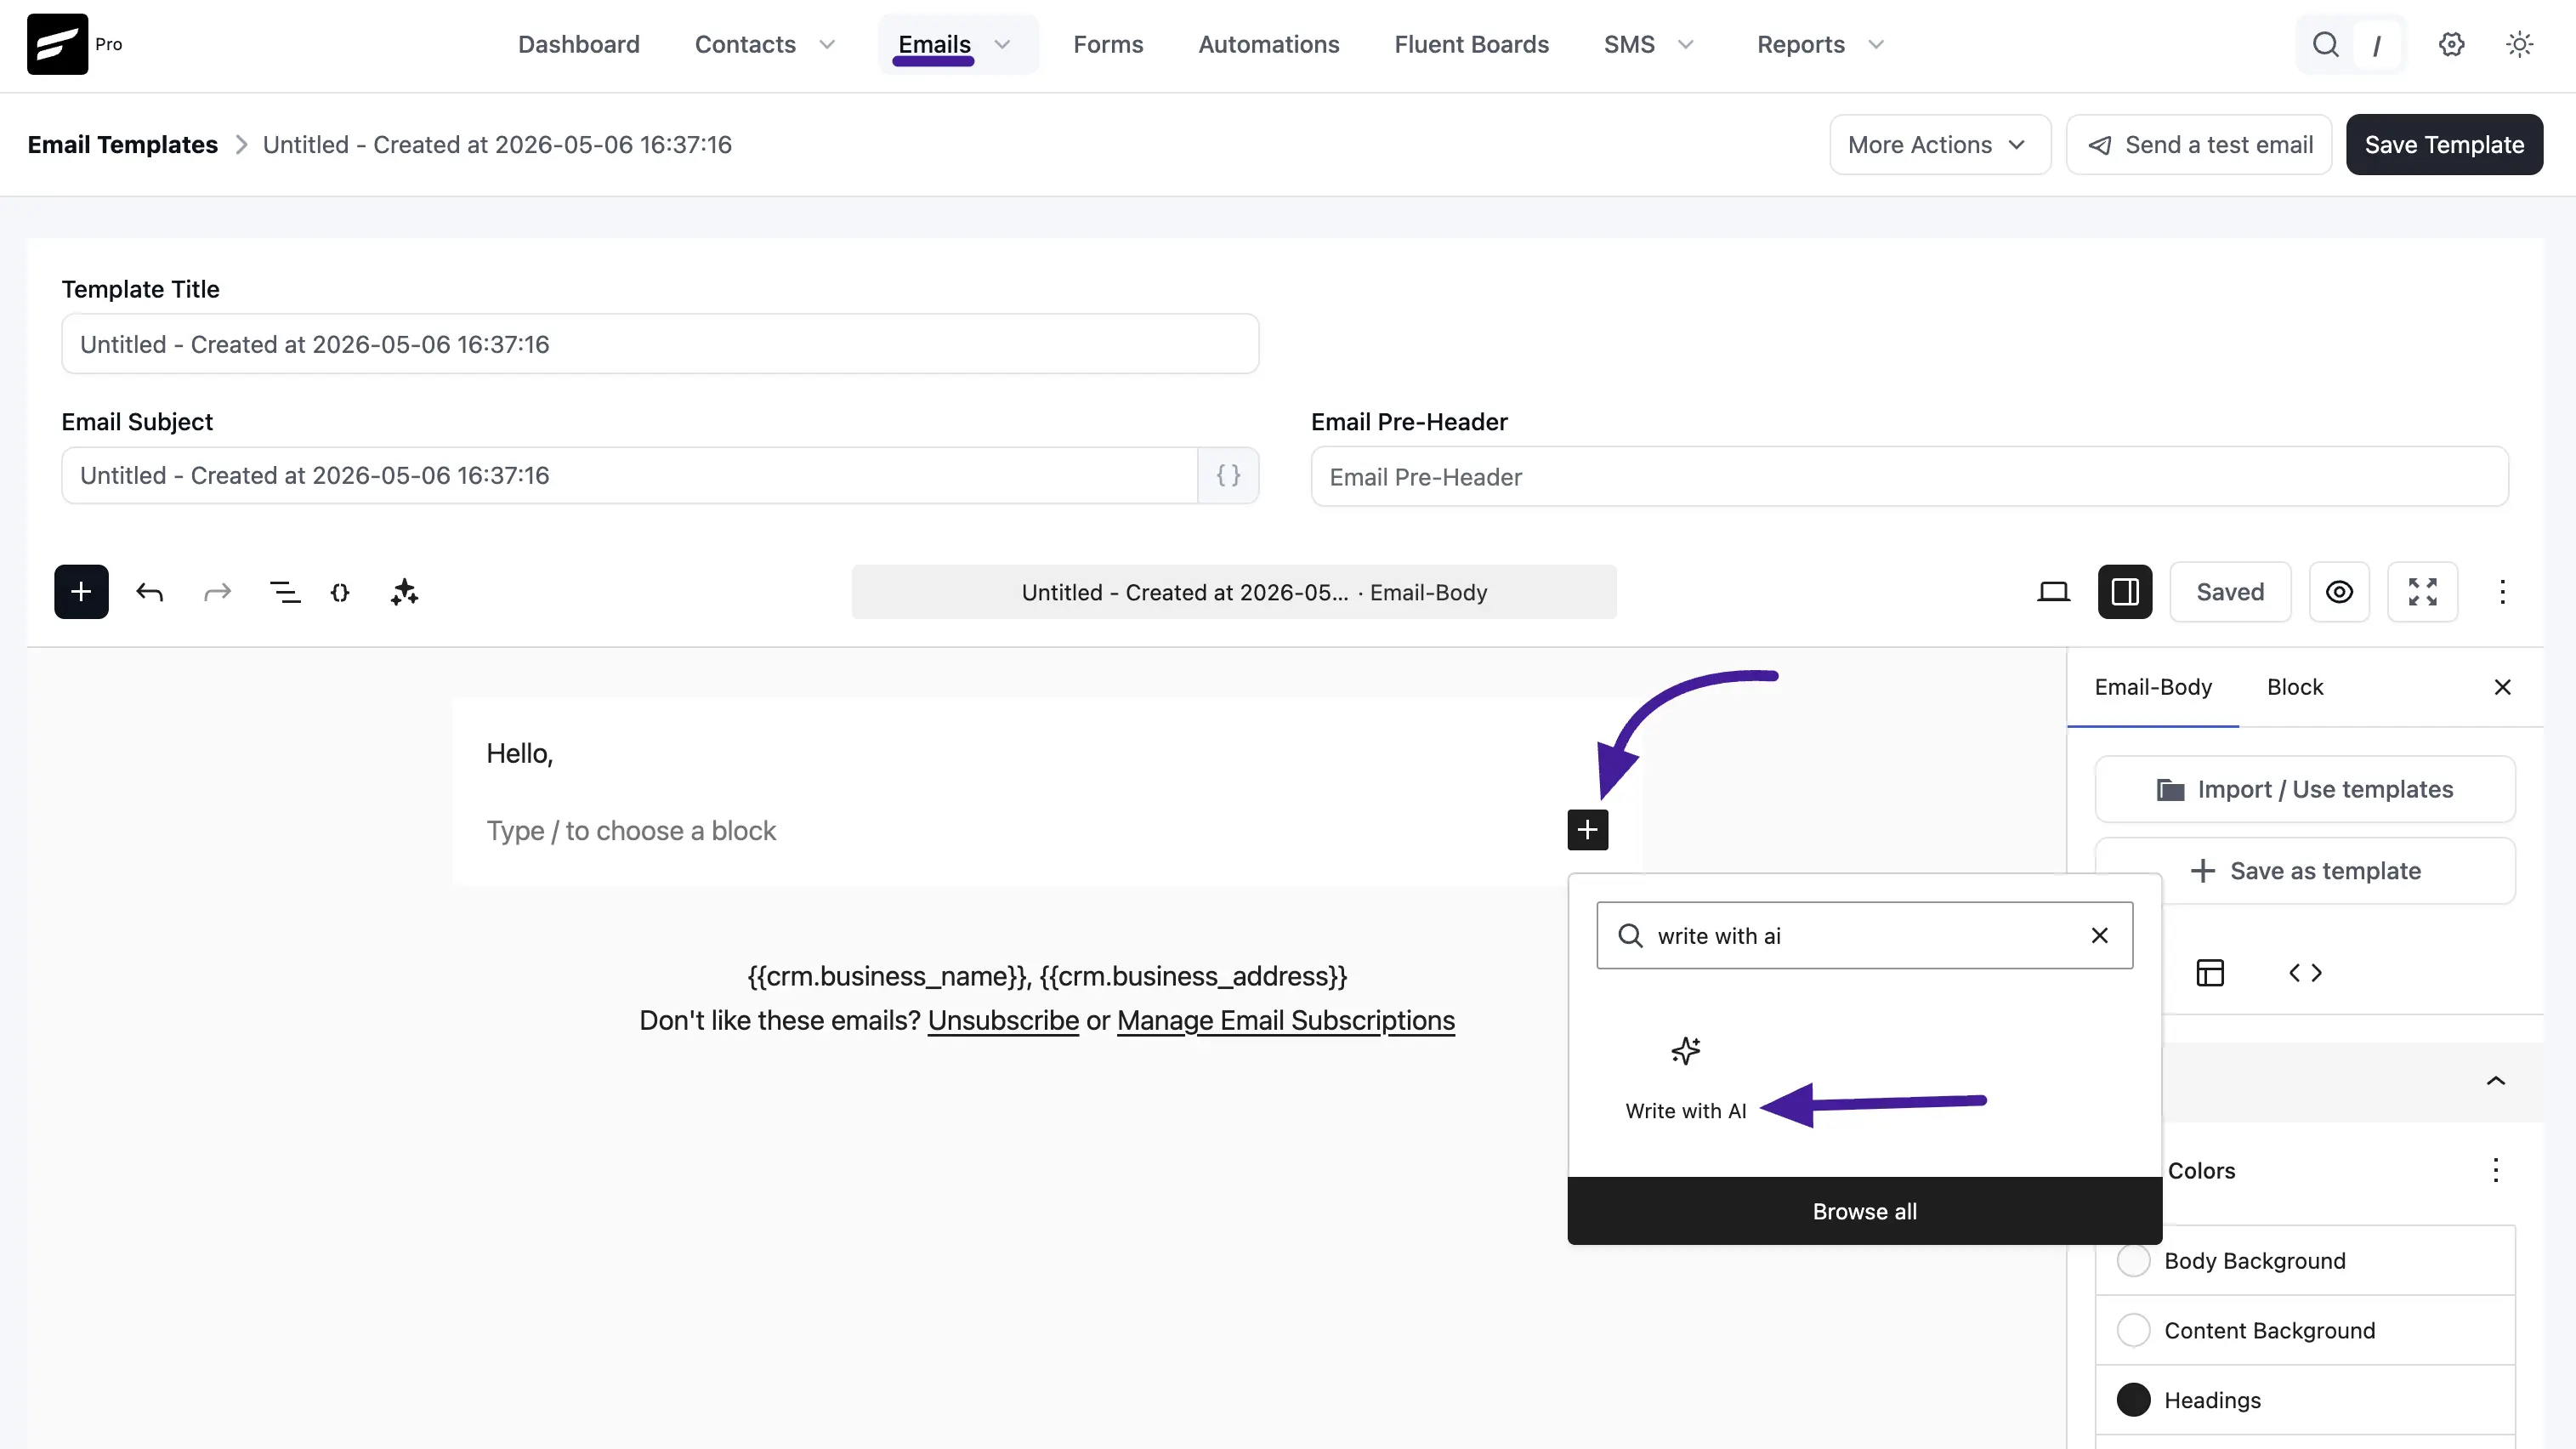
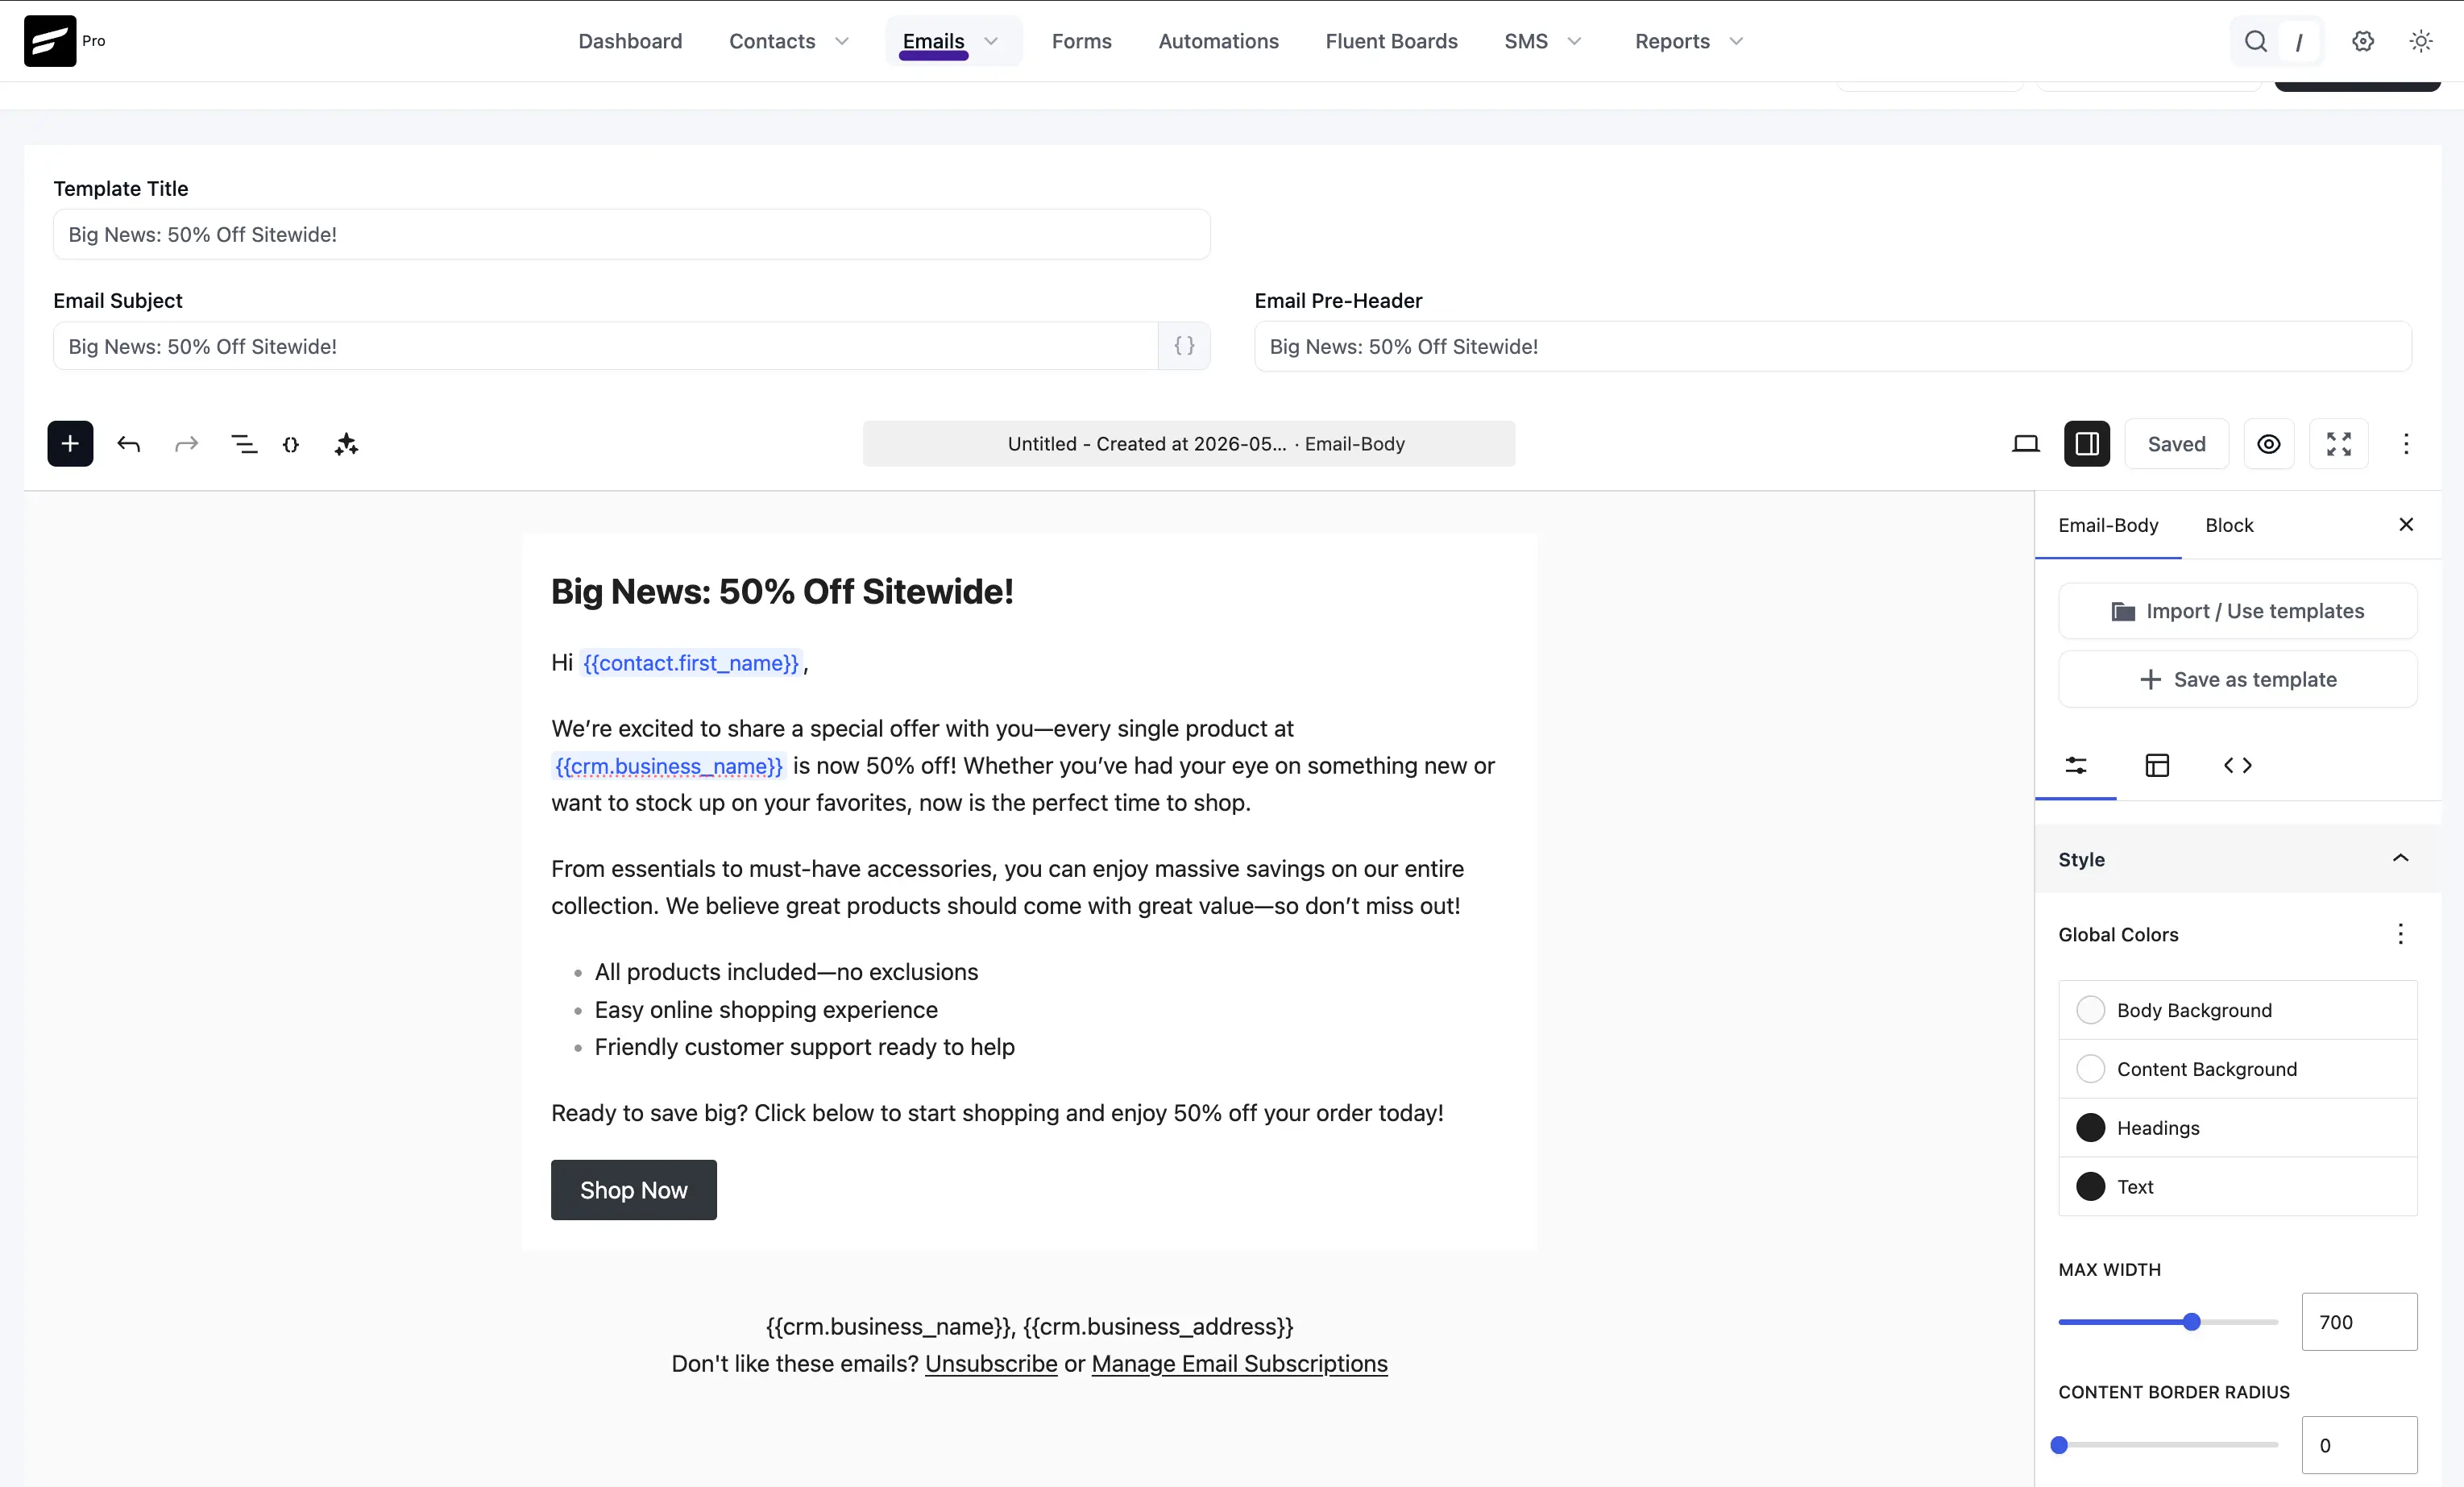
Inside the block you'll see a prompt area, a Tone dropdown (Professional, Friendly, Casual, etc.), and a Length dropdown (Short, Medium, Long). Describe what you want the email to say, pick a tone and length, and click Generate with AI.
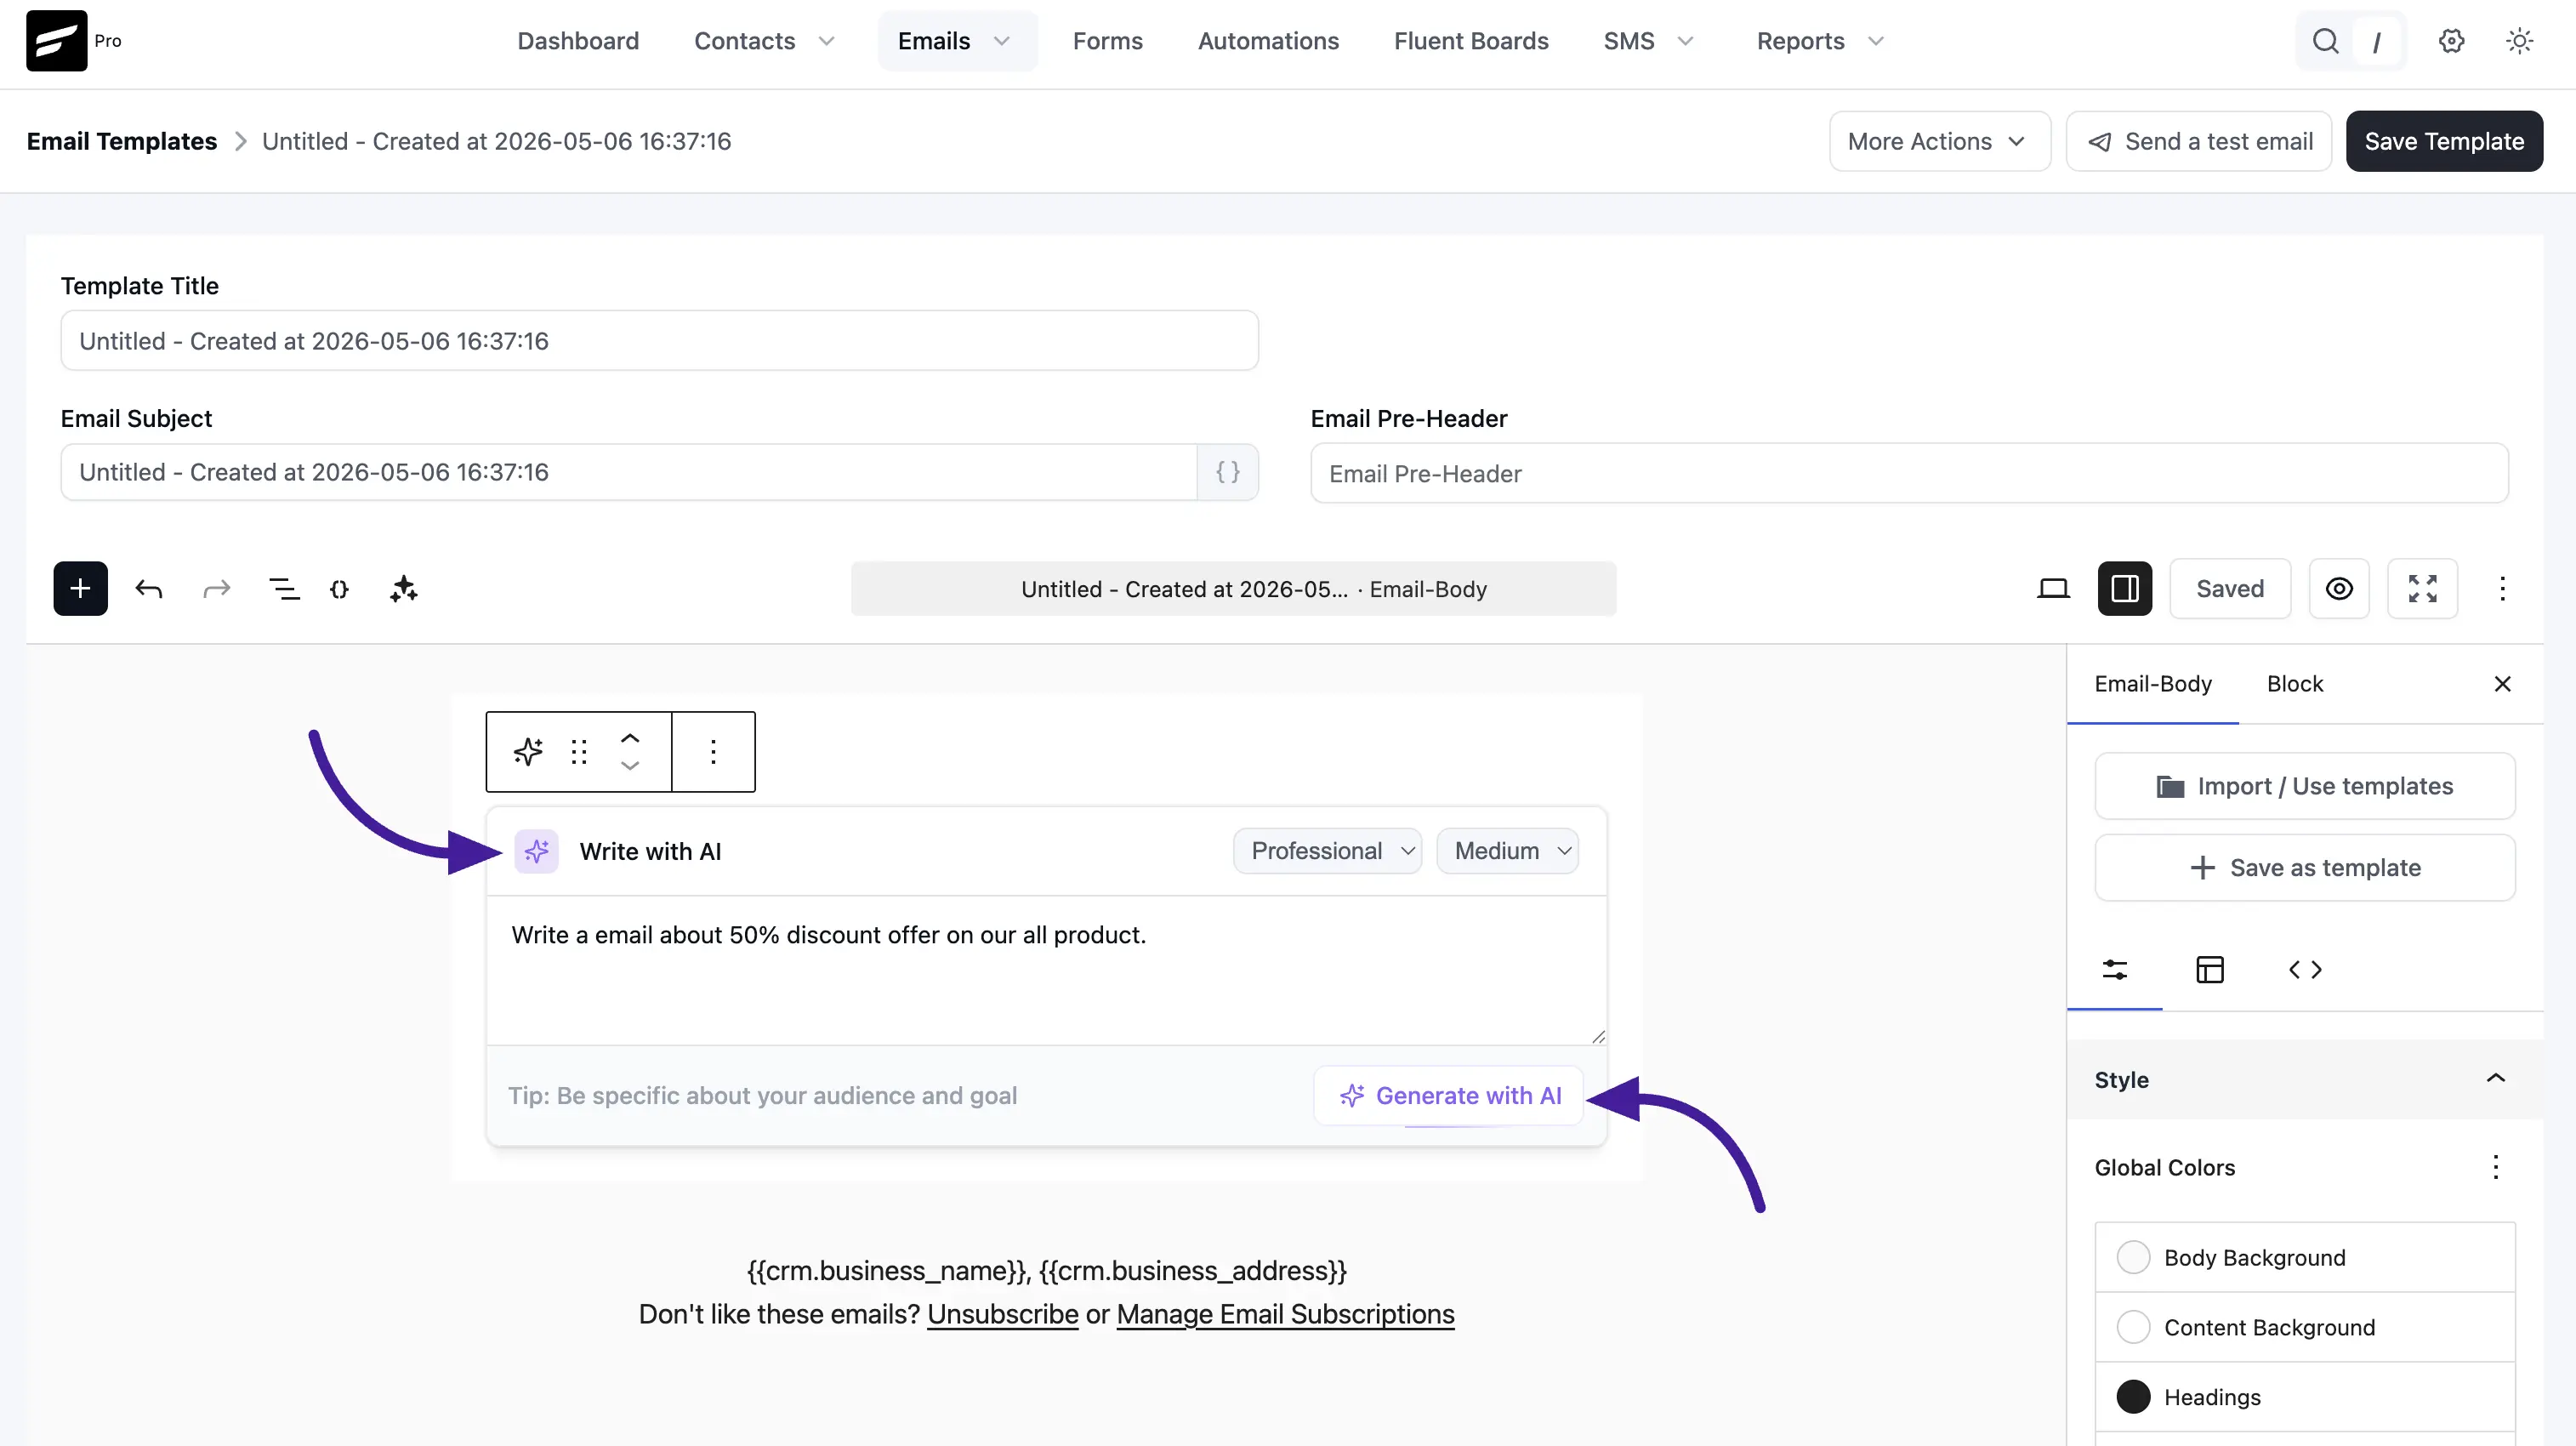
FluentCRM sends your prompt (along with the custom system prompt from Step 4, if you set one) to the provider, and replaces the block with a fully formatted email — heading, copy, bullet points, and a call-to-action button — that you can edit further like any other Gutenberg content.
TIP
Be specific in your prompt. "Write a 50% off launch email for our new SaaS plan, audience is existing customers, include a 24-hour deadline" gives better results than "write a discount email".
AI Writing toolbar (refine existing copy)
When you're editing an existing block of email content, select some text and click the AI Writing (sparkle) icon in the editor toolbar. A menu opens with five one-click actions:
- Rewrite: Rewrites the selection while keeping the same meaning.
- Shorten: Makes the selection more concise.
- Expand: Adds detail and engagement.
- Fix Grammar: Corrects grammar, spelling, and punctuation.
- Custom Prompt: Lets you describe exactly how the text should be transformed (for example, "make this sound more urgent" or "translate to French").
You can also set a Tone for these actions from the dropdown in the same menu (Professional by default).

This is the fastest way to polish copy you've already drafted, without leaving the editor.
AI Summary (in contact profiles)
Open any contact in FluentCRM → Contacts and look for the AI Summary button in the top-right of the profile, next to the Actions menu.

Click it to open the AI Summary popover. The first time you open it for a contact, the popover shows "No Saved Summary" with a Generate AI Summary button.
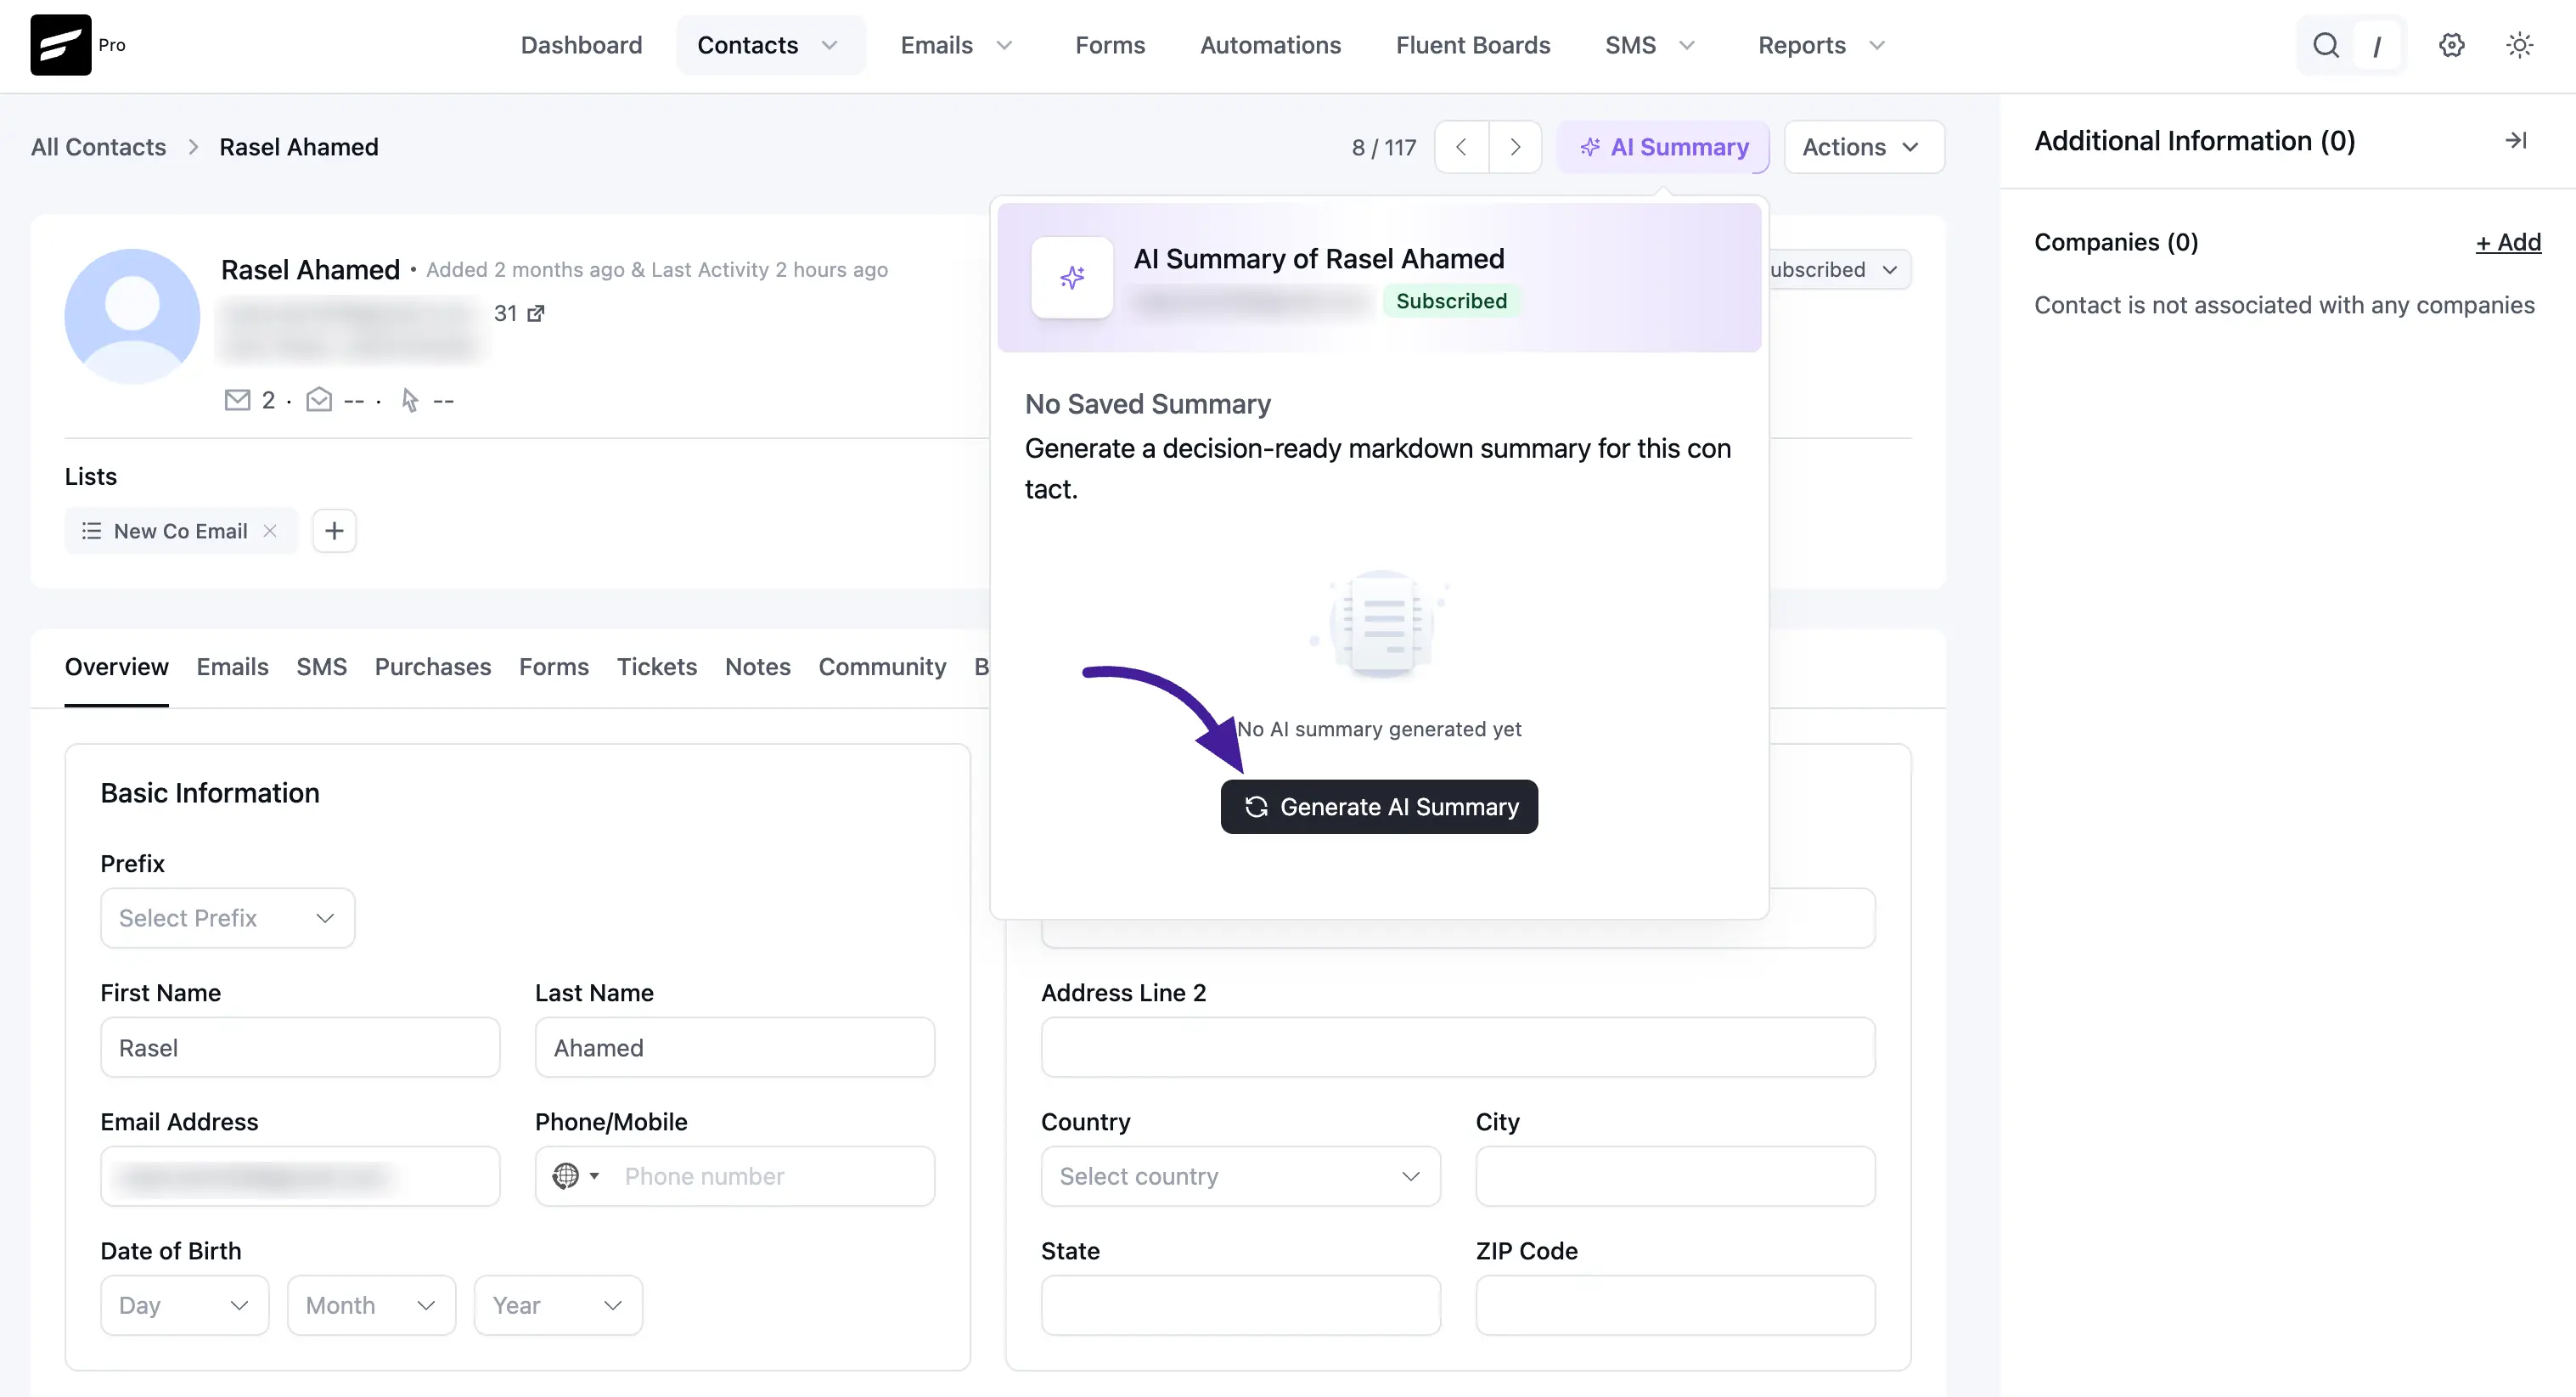
Click Generate AI Summary. FluentCRM pulls together the contact's engagement data, purchase history, course or membership activity, support tickets, and any risk signals, then sends them to your AI provider to generate a short, decision-ready report. The result is saved against the contact so you don't pay to regenerate it on every visit.
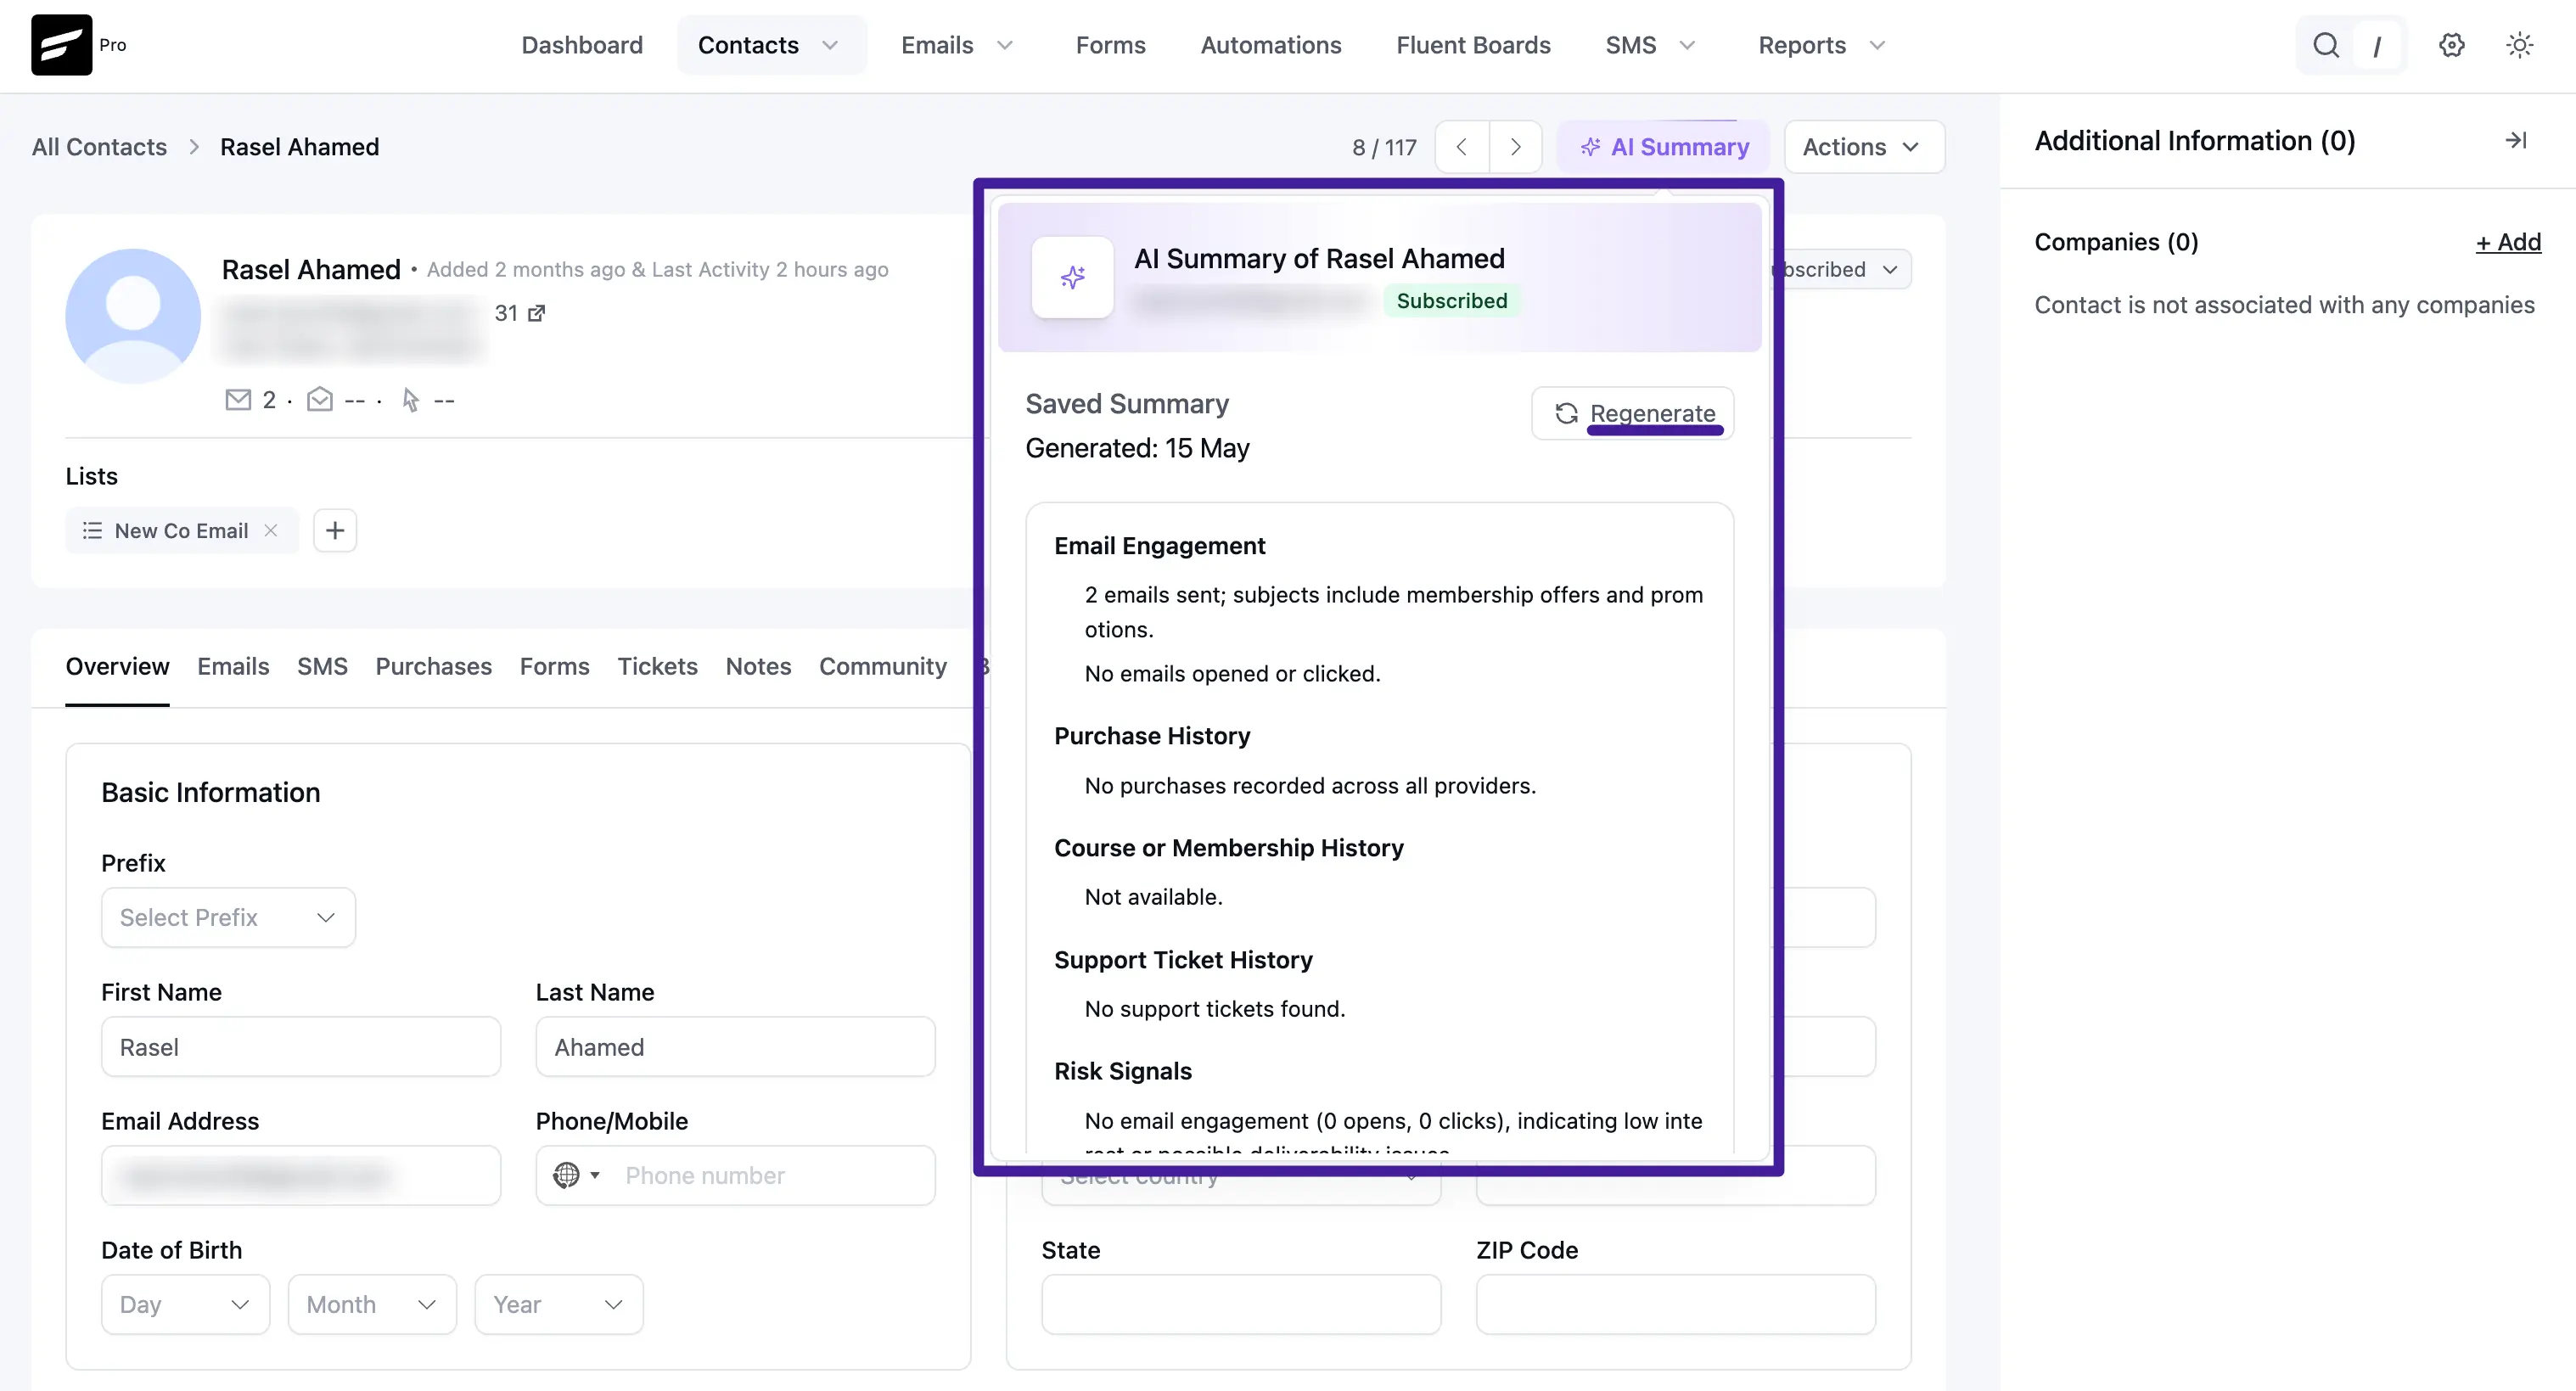
The summary covers (where data is available):
- Email Engagement: How many emails the contact has received, opened, and clicked, plus a sense of which topics they engage with.
- Purchase History: Orders, providers, and totals across your connected commerce integrations.
- Course or Membership History: Enrollments and progress from connected LMS or membership tools.
- Support Ticket History: Recent support interactions if you're connected to FluentSupport or similar.
- Risk Signals: Indicators like prolonged inactivity, low open rate, or possible deliverability issues, so you can act before you lose the contact.
Click Regenerate any time the underlying data has changed and you want a fresh summary.
Security & privacy
- Your API key stays on your server. It's stored as an encrypted FluentCRM option in your own WordPress database. WPManageNinja never sees it.
- AI calls go direct. Requests go from your site to OpenAI / Anthropic / Google. There is no proxy or relay step in between.
- Per-feature control. Turning off the master Enable AI toggle disables every AI surface (AI Summary, Write with AI block, AI Writing toolbar) at once. You can also remove the API key without uninstalling FluentCRM.
- Each provider has its own data policy. If you're sending sensitive contact data through AI Summary, check your provider's data-handling and retention terms before generating summaries at scale.
Related guides
- MCP for AI Agents: Connect external AI clients like Claude Desktop, Cursor, and OpenAI Codex to your CRM so they can read and write data directly.